Zitadel Configuration & Secrets
Zitadel Configuration
This section outlines the steps and components involved in configuring Zitadel. When configuring Zitadel, you will need to save a number of secrets that will later be referenced when installing the Istari Platform. Details on these are covered below. Following the initial configuration steps, this section provides guidance on handling Zitadel audit logs for information security purposes.
1. Create a ZITADEL Organization
- Purpose: The organization (
org_id) serves as the top-level structure for all projects, users, and roles. - Required Resources: Organization (
zitadel_org.default.id).
Steps
- Select the up/down arrows next to the Zitadel Org in the top left hand corner
- In the dropdown, select "+ New Organization"
- In the Create Organization screen, set the name of the org as your business unit or company name (In this guide, we've set the name of our first org as "istari")
- Select the "Create" button and you should have a new org
2. Create the ZITADEL Project
Purpose: Projects in ZITADEL group applications and roles together for specific use cases (e.g., istari).

Steps
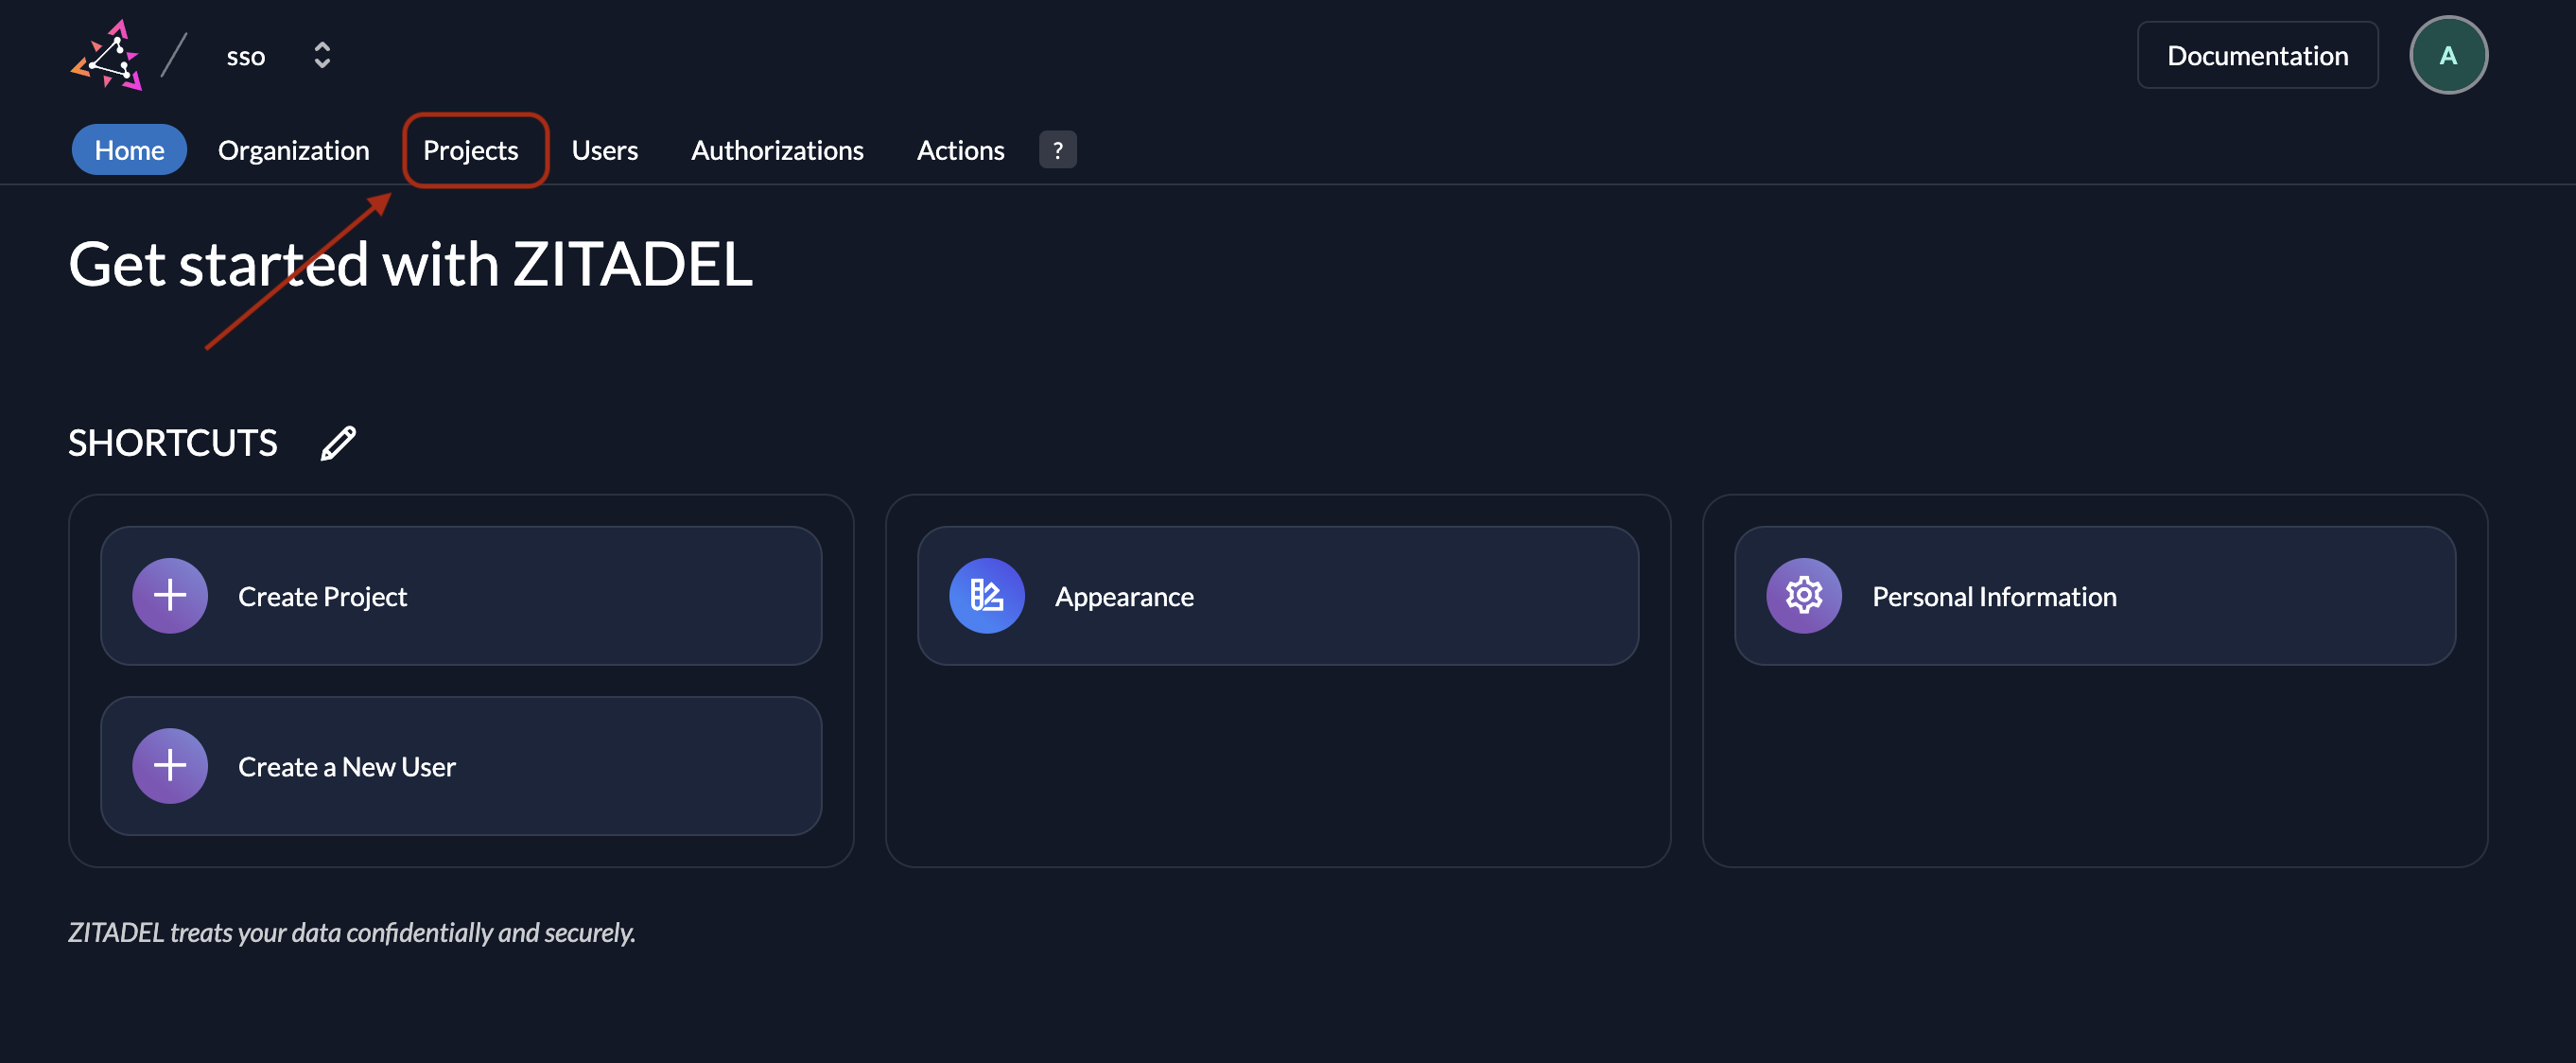
- In the org you created in a step above, select "Projects" in the nav header
- Select the "Create New Project" card
- Set the name of the project as "istari"
- Select the "Continue" button
- Next navigate to the project and select the General tab on the left hand side
- Set project settings to the following:
- Assert Roles on Authentication: Checked
- Check authorization on Authentication: Unchecked
- Check for Project on Authentication: Checked
- Then select the "Save" button
3. Create a Human User (Org Owner)
Purpose: Create a human user (usually the organization's owner or administrator). And assign Org_Onwer and IAM_Owner roles
Steps
- In the org you created in a step above, select "Users" in the nav header
- Select the "+ New" button in the top right hand corner
- In the new user form add the following values:
- Email: this needs to be an email you have access to
- User Name:
istari_local - Given Name:
local - Family Name:
admin - Email Verified: Checked
- Set Initial Password: Checked
- Then set the initial password to be used on first login
- After the fields above have been filled out, select the "Create" button
- Add as an Org Owner:
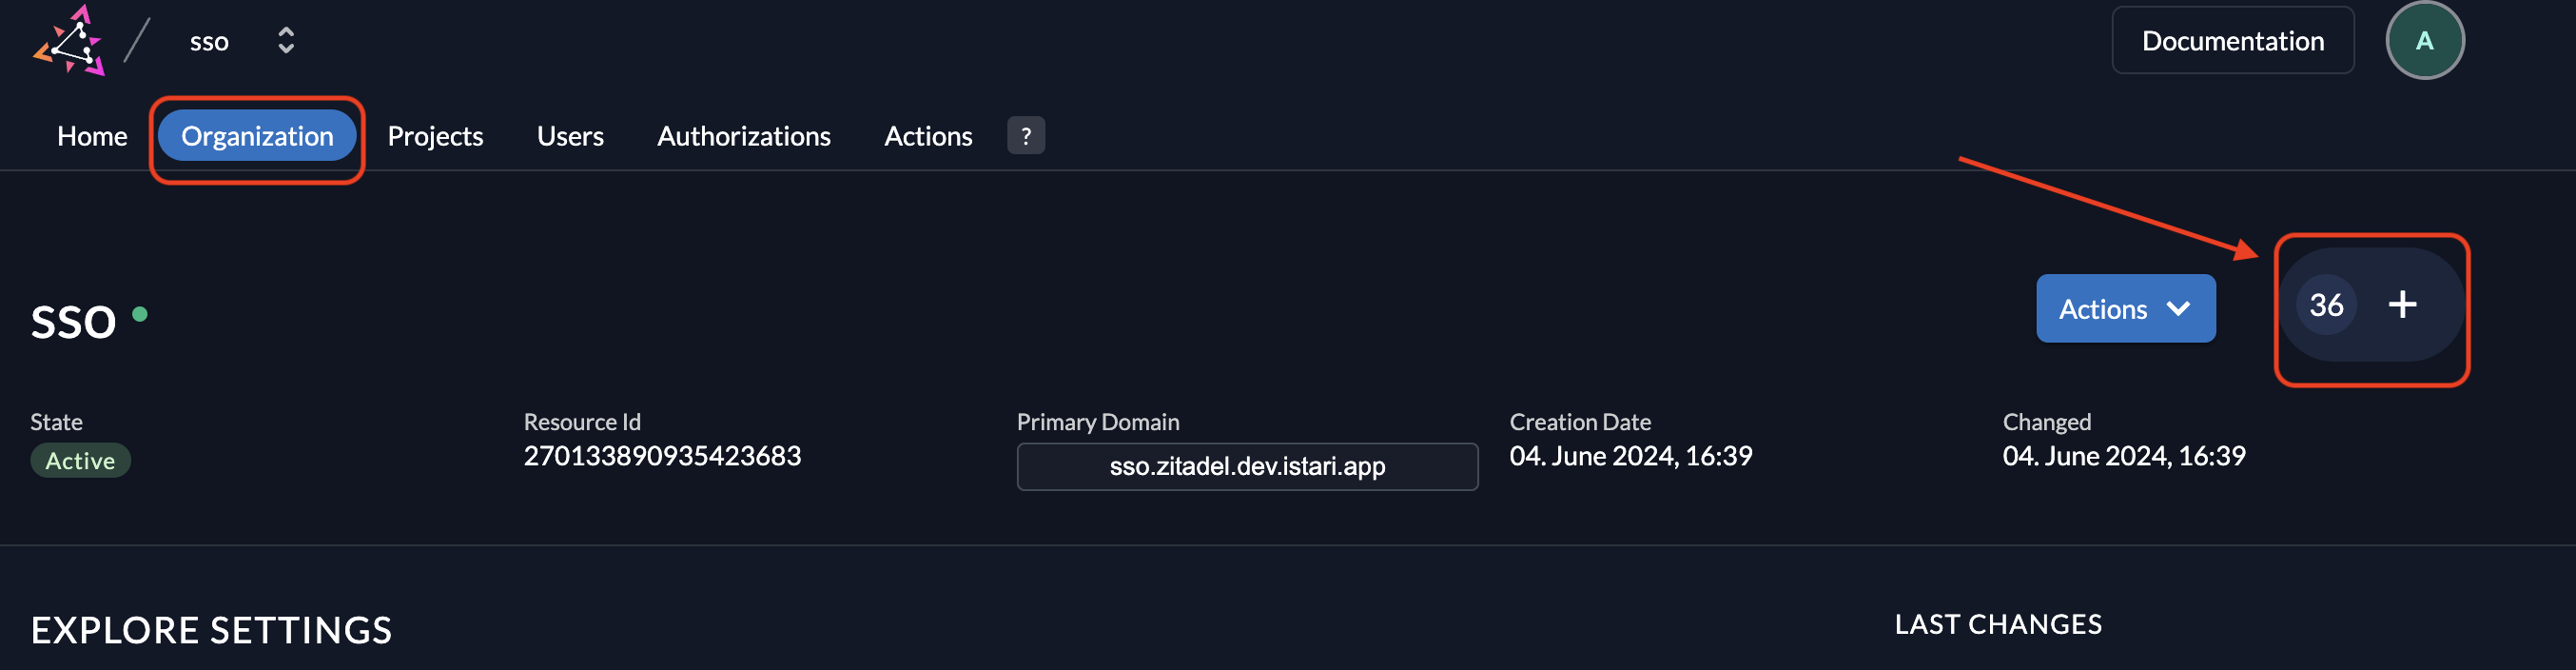
- After the user has been created, select "Organization" in the nav header
- Select the + sign to the right of the actions button to add a user as an Org_Owner/Manager
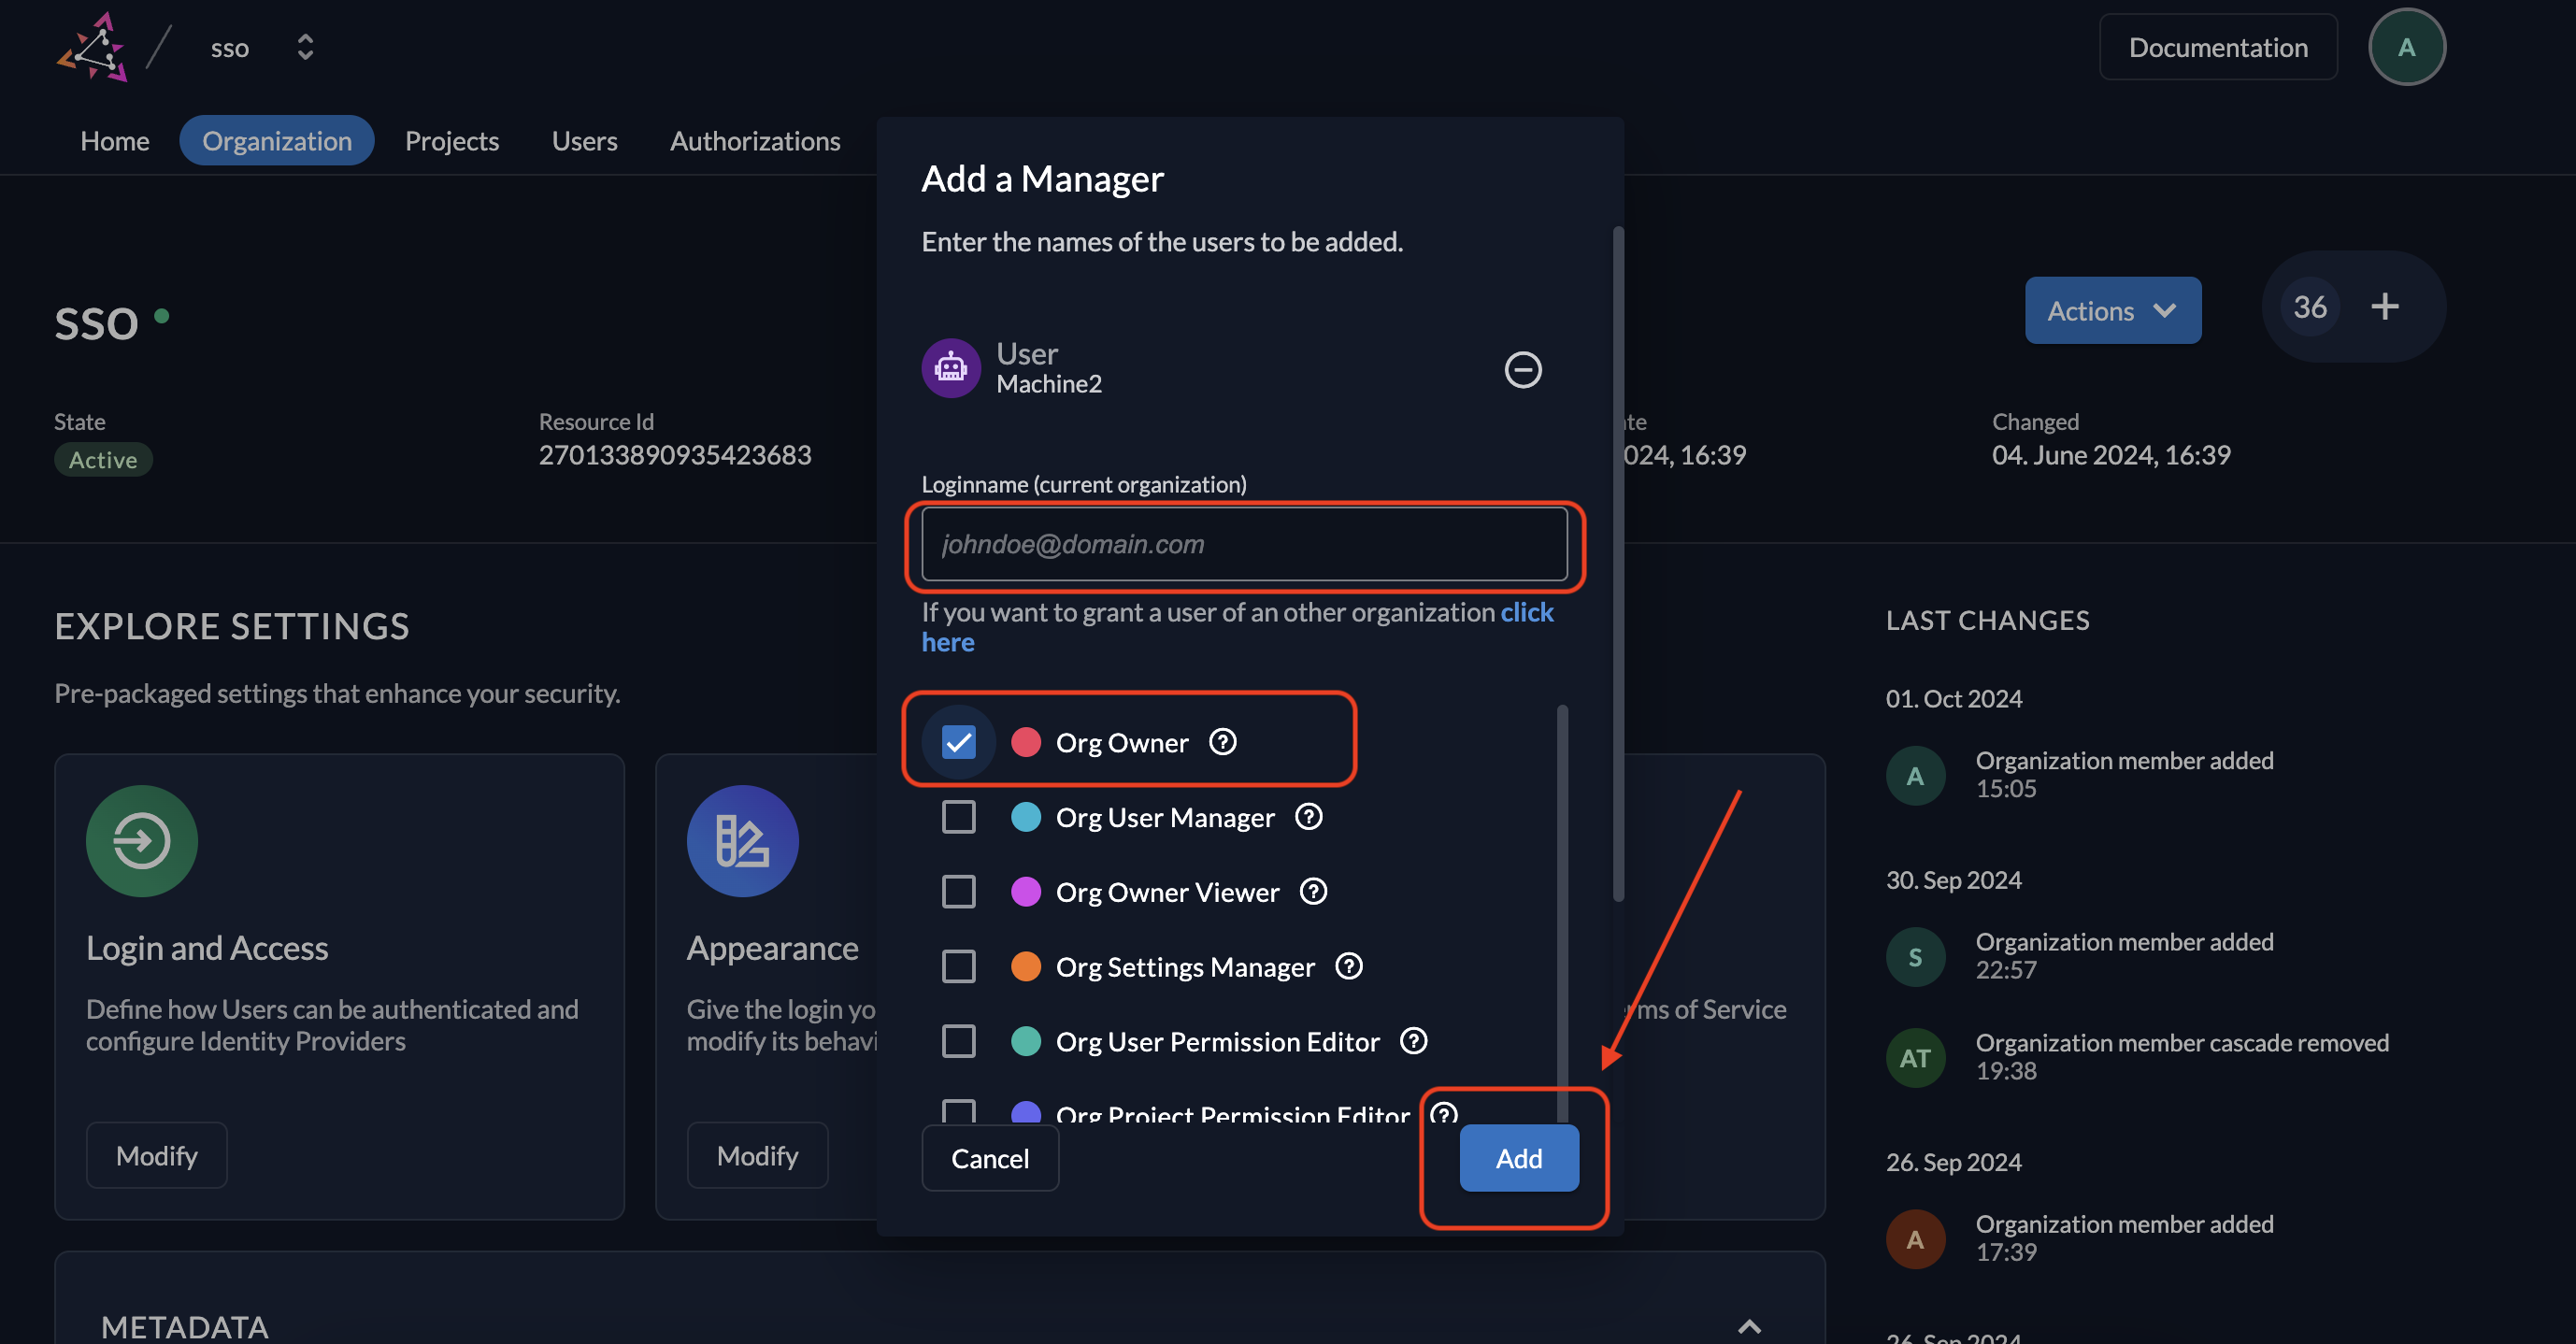
- In the "Add a Manager" modal, select the user you created in the steps above and select
Org Ownerand select the "add" button
- Add as an IAM Owner:
- Then select the Default Settings" button in the top right hand corner next to your user profile
- Select the + sign to the right of the actions button to add a user as an
IAM_Owner - In the "Add a Manager" modal, select the user you created in the steps above and select
IAM_Ownerand select the "add" button
4. Define Project Roles
Purpose: Create custom roles for the project (e.g., customer_admin, istari_agent, service_admin).
Steps
- In the org you created in a step above, select "Projects" in the nav header and select the project created in an earlier step
- In the left hand nav panel select "Roles"
- Select the "+ New" button to create new roles
- We will have to create 3 roles and we can do this all at once by selecting the "Add additional role" button twice to add two more
- For each role below the Key, Display Name and Group fields will be identical. Here are the roles that need to be added:
customer_administari_agentservice_admin
- Once you’ve added all the roles select the "Save" button
5. Grant Roles to the Organization
Purpose: Grant the created roles to the organization, enabling the roles to be used within the project.
Steps
- In the org you created in a step above, select "Projects" in the nav header and select the project created in an earlier step
- In the left hand nav panel select "Grants"
- Select the "+ New" button
- In the "Search an organization" field, select the organization you created in an earlier step and select the "Continue" button
- In the next screen select all the grant roles and select the "Save" button
6. Create applications
Purpose: Set up applications for the frontend and backend of Istari
Steps For getting to the application creation workflow
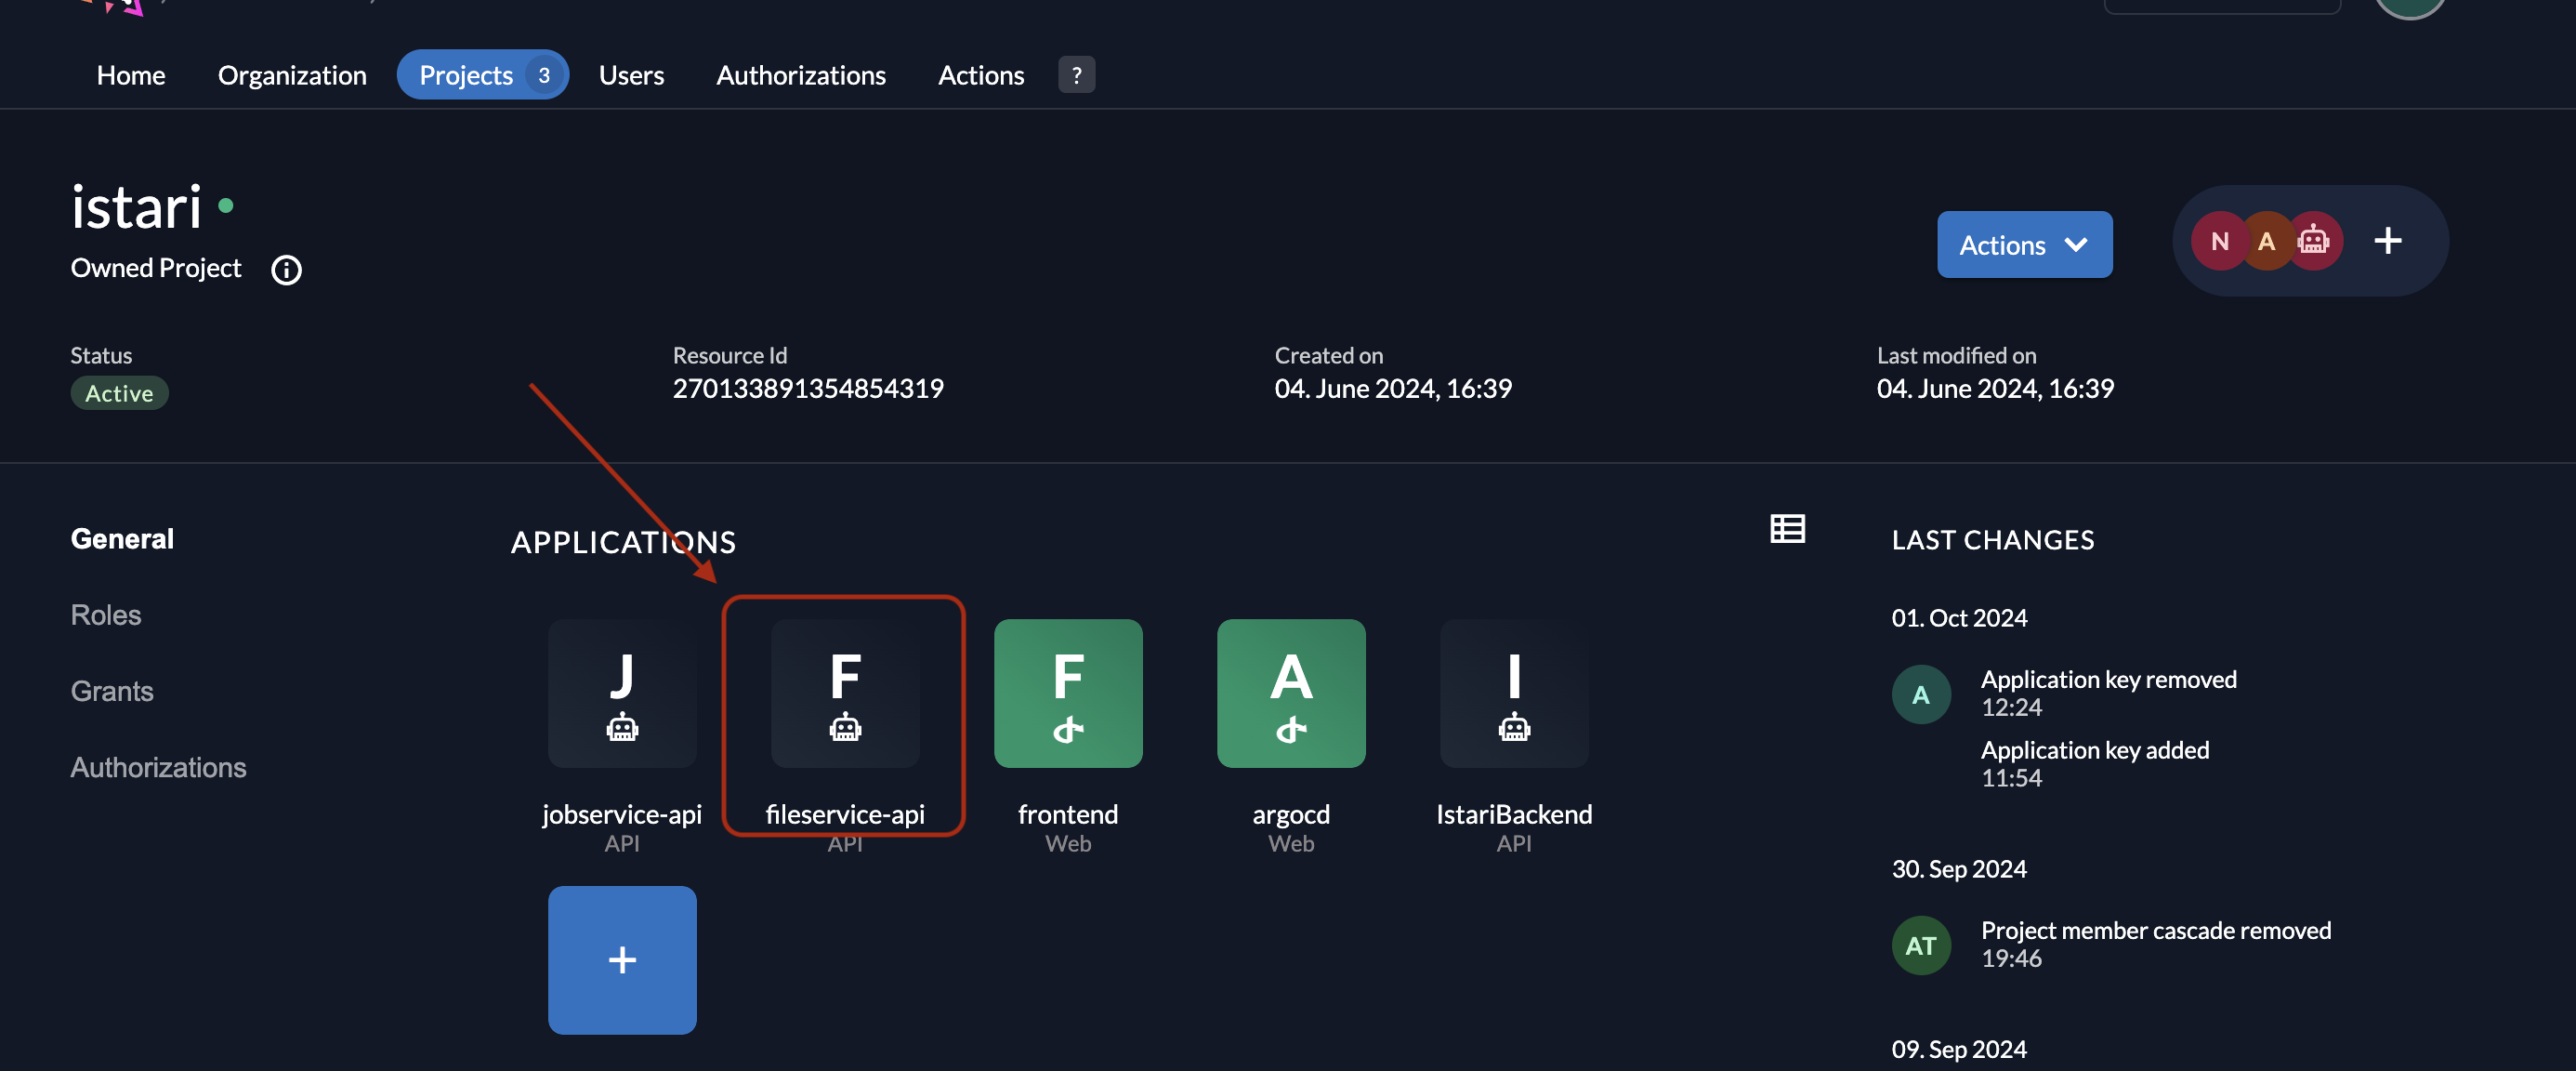
- In the org you created in a step above, select "Projects" in the nav header and select the project created in an earlier step
- Select the square with a plus icon to add a new application, it should be under the Applications header
Frontend Application
- Set the name for the application to "frontend" and Set the application type to "Web" and select the "Continue" button
- Set Authentication Method as "PKCE" and select the "Continue" button
- You’ll need to add Redirect and Post Logout URLS. They should be the same and follow this naming convention:
https://{{ your frontend domain }} - Once the URLS are set select the "Continue" button:
- Select the "Create" button and then select the "Close" button on the modal
- Configuration Tab:
- Select the "Configuration" tab in the left hand nav panel and toggle "Refresh Token" to on
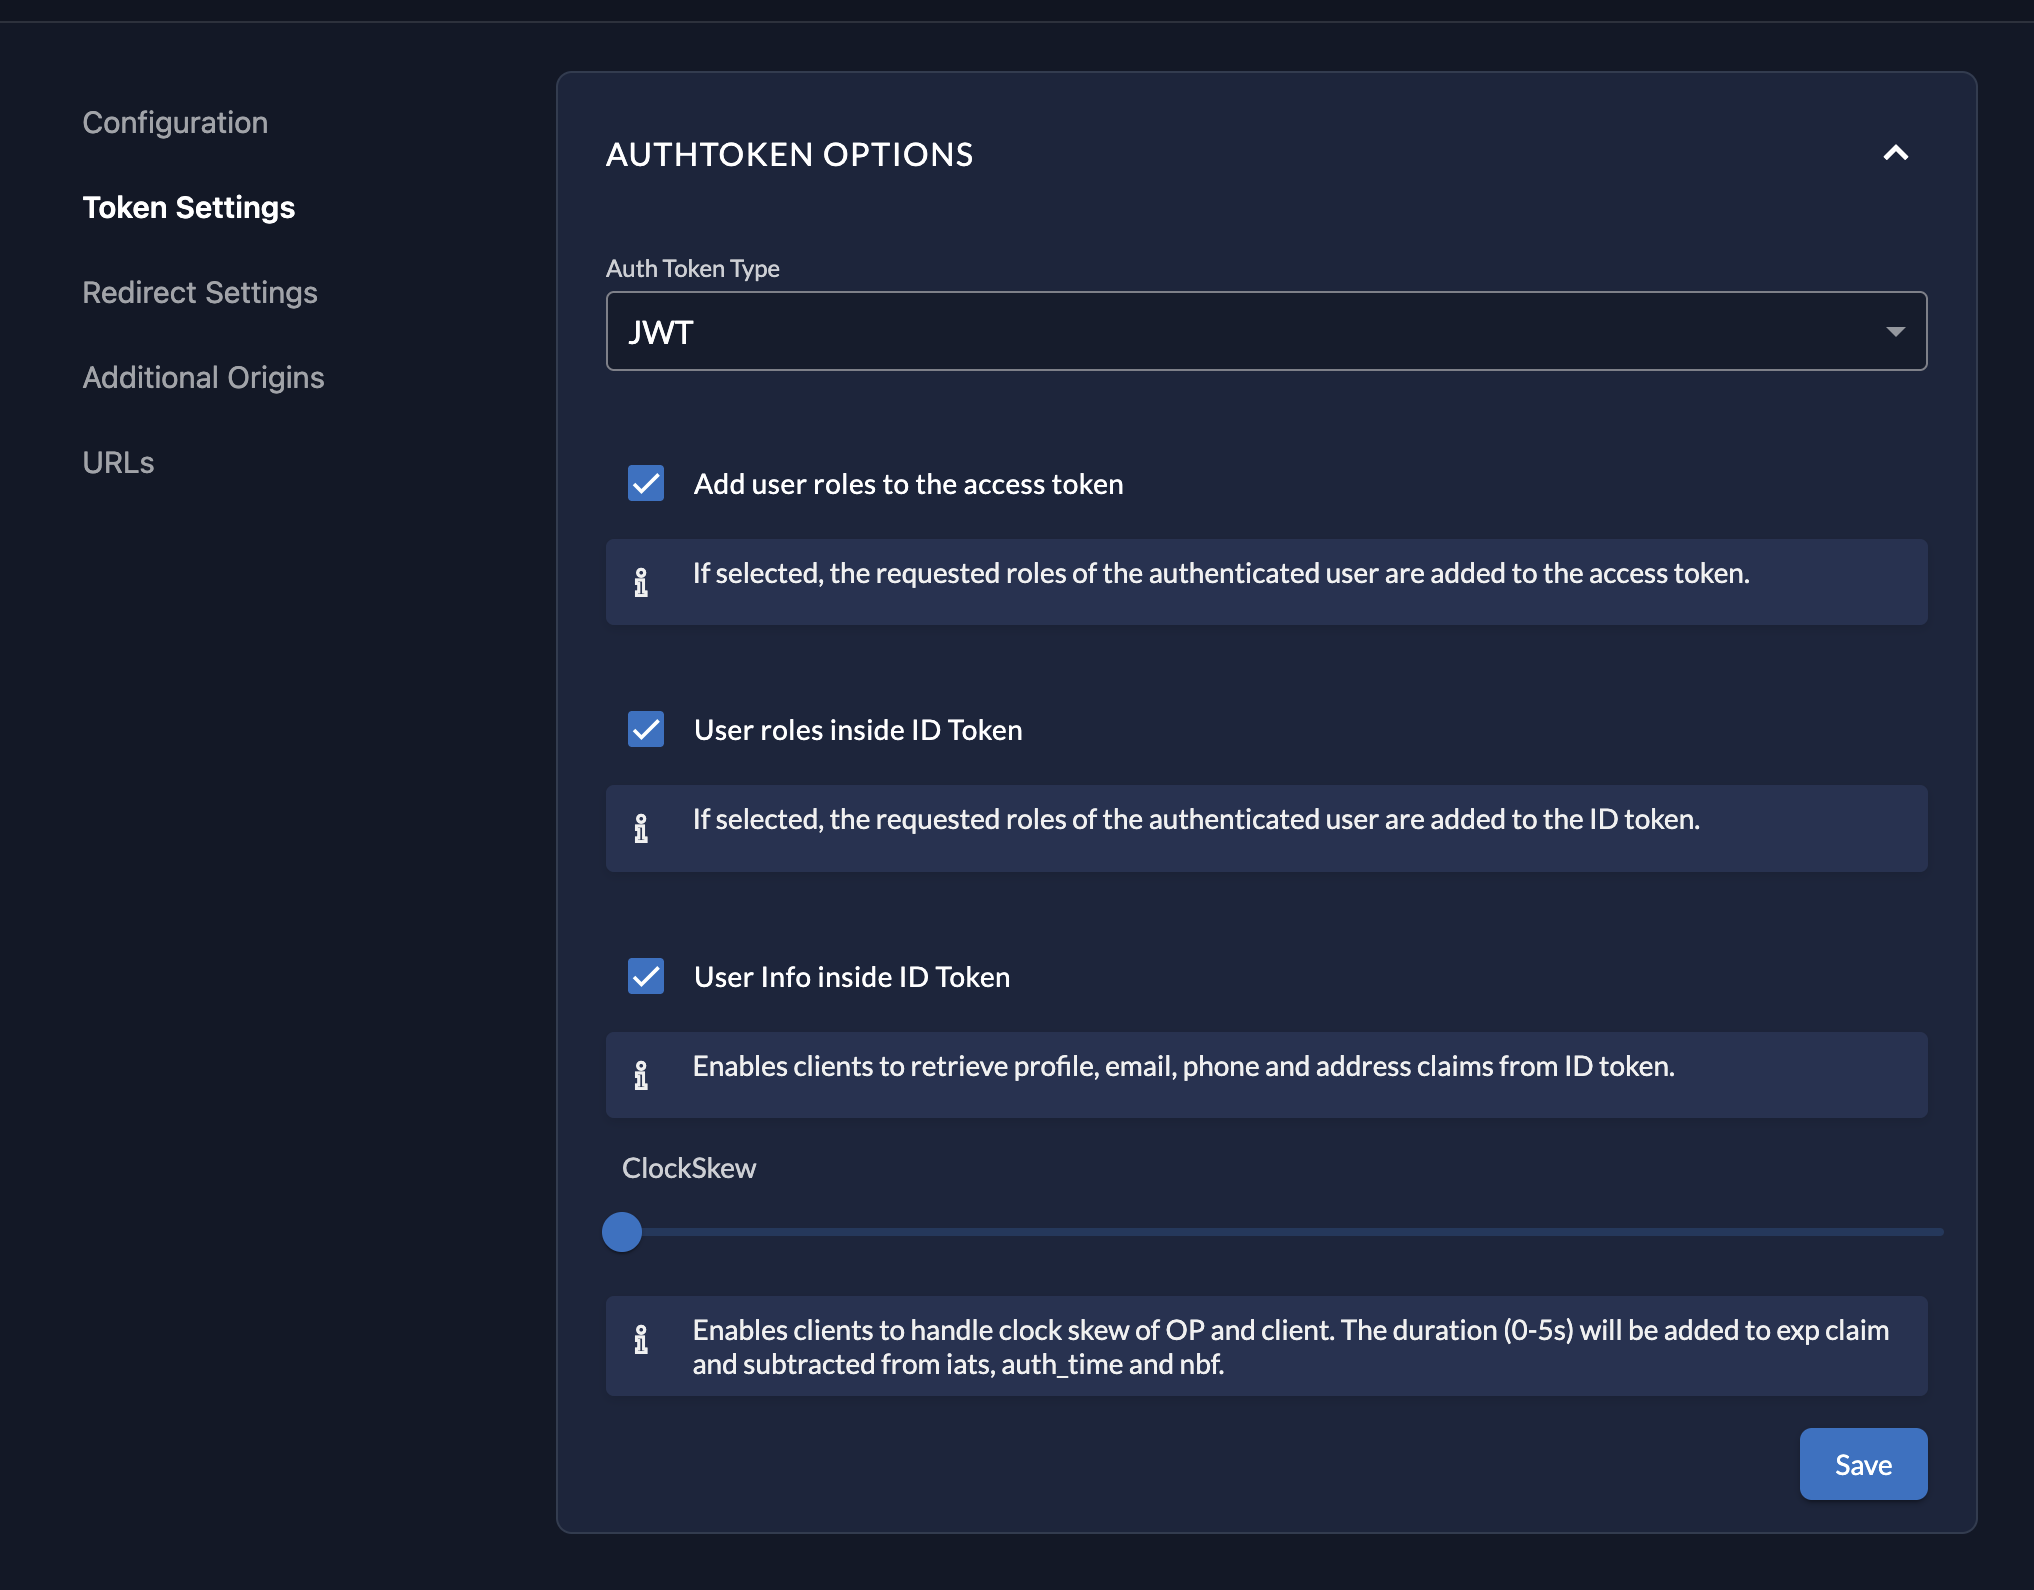
- Token Settings tab:
- Select the "Token Settings" and set the Auth token Type to "JWT"
- Then toggle the following to true and select the "Save" button:
- "Add user roles to the access token"
- "User roles inside ID Token"
- "User Info inside ID Token"
MCP Service Application
- Set the name for the application to "mcp-service" and Set the application type to "Web" and select the "Continue" button
- Set Authentication Method as "Basic" and select the "Continue" button
- You'll need to add Redirect (Callback) and Post Logout URLS. They should be the same and follow this naming convention
Callback:
https://{{ your mcp service domain }}/auth/callbackPost Logout:https://{{ your mcp service domain }}Note: Certain LLM applications require a specific callback for their OAuth Flow. For example, Claude Desktop requires that the following callback be set:https://claude.ai/api/mcp/auth_callback - Once the URLS are set select the "Continue" button:
- Select the "Create" button and then select the "Close" button on the modal
- Save the Client ID and Client Secret displayed after creation. These values are required for the MCP Secret configuration (
ISTARI_DIGITAL_ZITADEL_CLIENT_IDandISTARI_DIGITAL_ZITADEL_CLIENT_SECRET). - Configuration Tab:
- Select the "Configuration" tab in the left hand nav panel and toggle "Refresh Token" to on
- Token Settings tab:
- Select the "Token Settings" and set the Auth token Type to "JWT"
- Then toggle the following to true and select the "Save" button:
- "Add user roles to the access token"
- "User roles inside ID Token"
- "User Info inside ID Token"
Registry-Service-API Application
- Set the name for the application to "registry-service-api" and Set the application type to "API" and select the "Continue" button
- Set Authentication Method as "JWT" and select the "Continue" button
- Select the "Create" button
7. Create and setup the service/machine user
Purpose: Create a machine user that will interact with the registry-service.
- Create the machine user:
- In the "istari" org, select "Users"
- Above the Users table, select "Service Users"
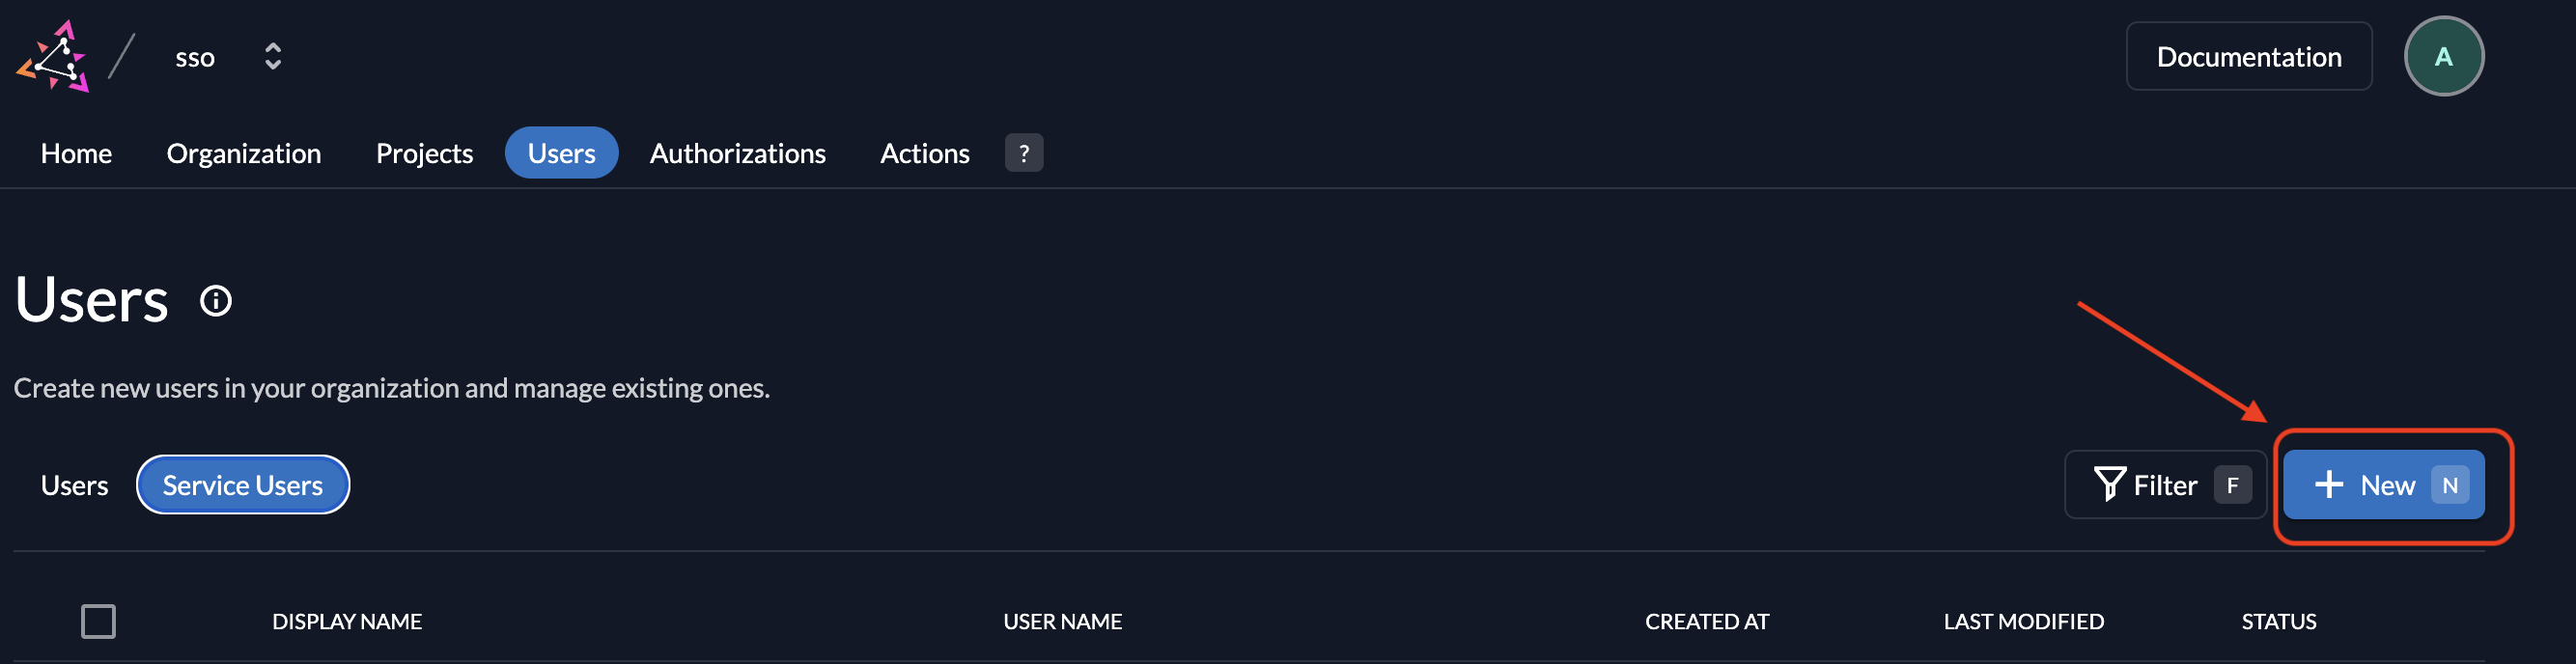
- Select the "+ New" button
- Set the User name to "RegistryServiceMachineUser"
- Set access token type to "JWT"
- Select the "Create" button
- Add grants to the user:
- Once the user has been created, go back to the user and select "Authorizations"
- Select the "+ New" button to create new authorizations
- Search for the project you created in a step above and select the "Project"
- Add all of the roles you created in a step above and then select "Save"
- Add as an Org Owner:
- After the user has been created, select "Organization" in the nav header
- Select the + sign to the right of the actions button to add a user as an Org_Owner/Manager
- In the "Add a Manager" modal, select the user you created in the steps above and select "Org Owner" and select the "add" button
- Add as an IAM Owner:
- Then select the "Default Settings" button in the top right hand corner next to your user profile
- Select the + sign to the right of the actions button to add a user as an IAM_Owner
Registry Service Machine User IAM permissions for Object Stores
The Istari Registry Service controls access for all Istari users wishing to access or upload files, Models and artifacts in an Istari installation. The Registry Service Machine User identity must have specific permissions on any object stores associated with tenants in an Istari installation.
These permissions allow the Registry Service Machine User to generate presigned URLs that can be used by Istari users for access to files and models, without having to expose object store credentials directly to users.
For object stores configured as AWS S3 buckets, the Registry Service Machine User must have the following permissions:
- s3:AbortMultipartUpload
- s3:GetObject
- s3:ListBucket
- s3:PutObject
8. SMTP configuration
Purpose: Setting this up will allow Zitadel to send email notifications
Steps
- Select the "Default Settings" button in the top right hand corner next to your user profile
- In the left hand nav panel select "SMTP Provider"
- From here select your provider from the list or "Generic SMTP" if your provider is not shown
- Here is a link to the Zitadel docs for configuring an SMTP Provider
Getting Zitadel Secrets
There are several secrets you will need to grab. Here is the short list with instructions below on how to get each one.
FILE_SERVICE_ZITADEL_SECRETFILE_SERVICE_ZITADEL_USER_MANAGER_SECRETFILE_SERVICE_ZITADEL_CLIENT_IDFILE_SERVICE_ZITADEL_PROJECT_IDFILE_SERVICE_ZITADEL_PROJECT_GRANT_ID
Generating FILE_SERVICE_ZITADEL_SECRET
FILE_SERVICE_ZITADEL_SECRET is a Private Key JWT
-
Go to the Projects tab.
-
Select the project you are working on, or create a new one if none exists.
-
Select the application for which you want to generate a secret, or create one if necessary.
-
In the Keys section, click + New.
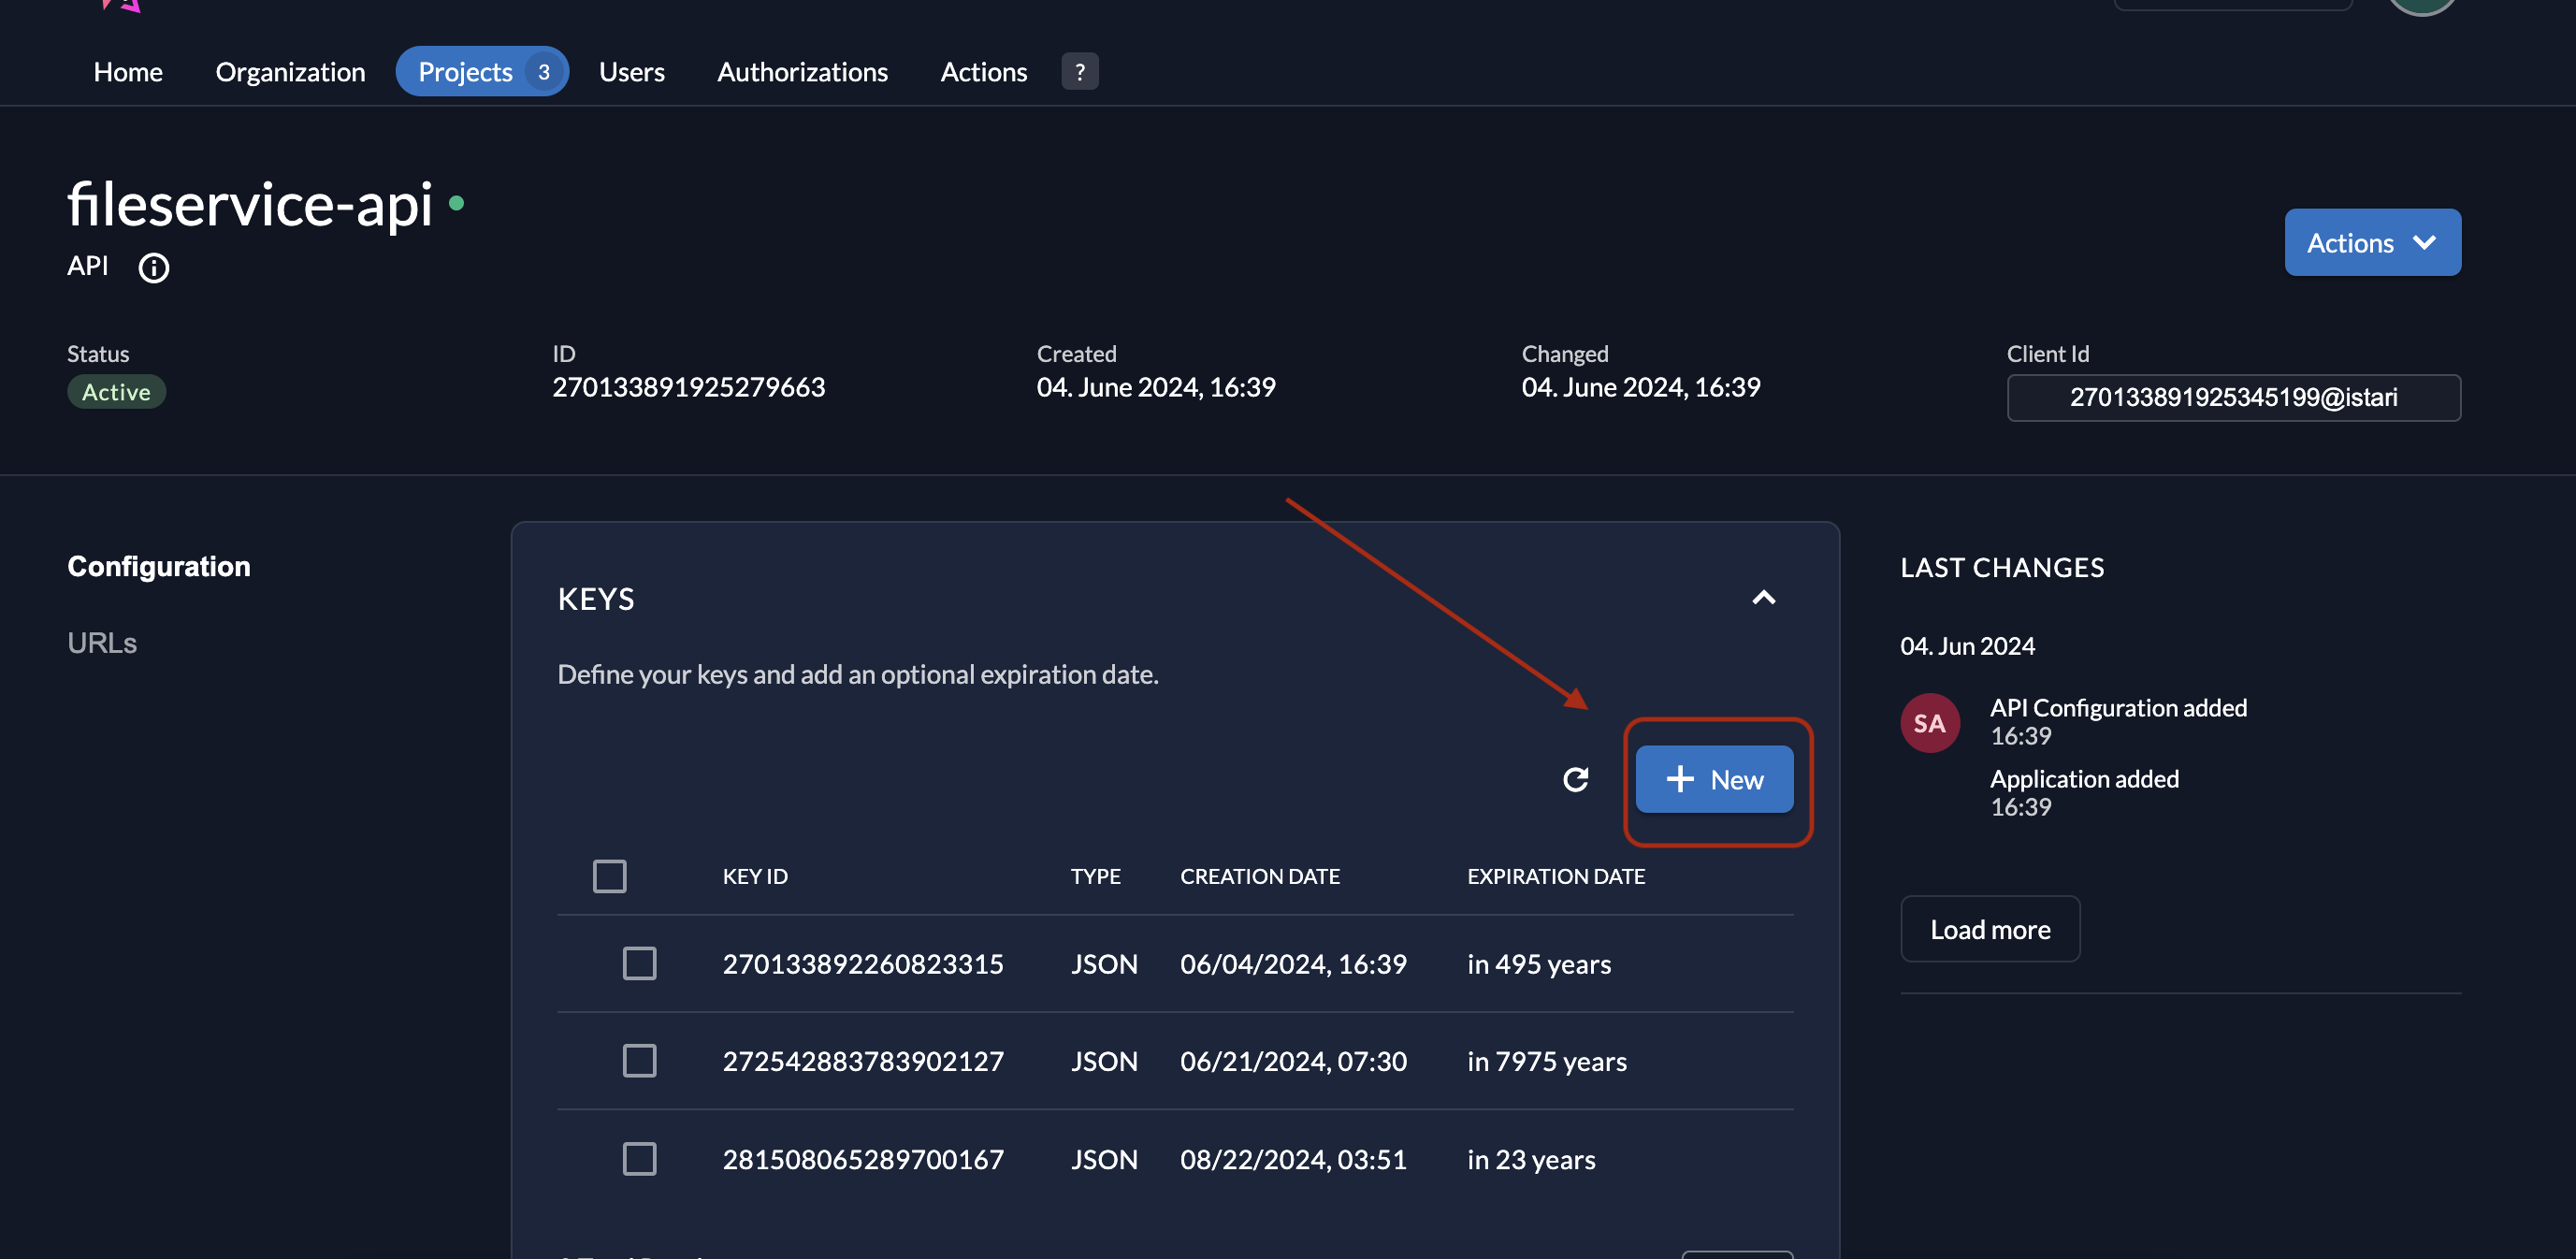
-
A popup will open; click Add Key to generate a new key.

-
Download and securely store the key, which will look like:
{"type": "application","keyId": "287354917666947744","key": "-----BEGIN RSA PRIVATE KEY-----\nMIIEogIBAA...\n-----END RSA PRIVATE KEY-----\n","appId": "270133891925279663","clientId": "270133891925345199@istari"}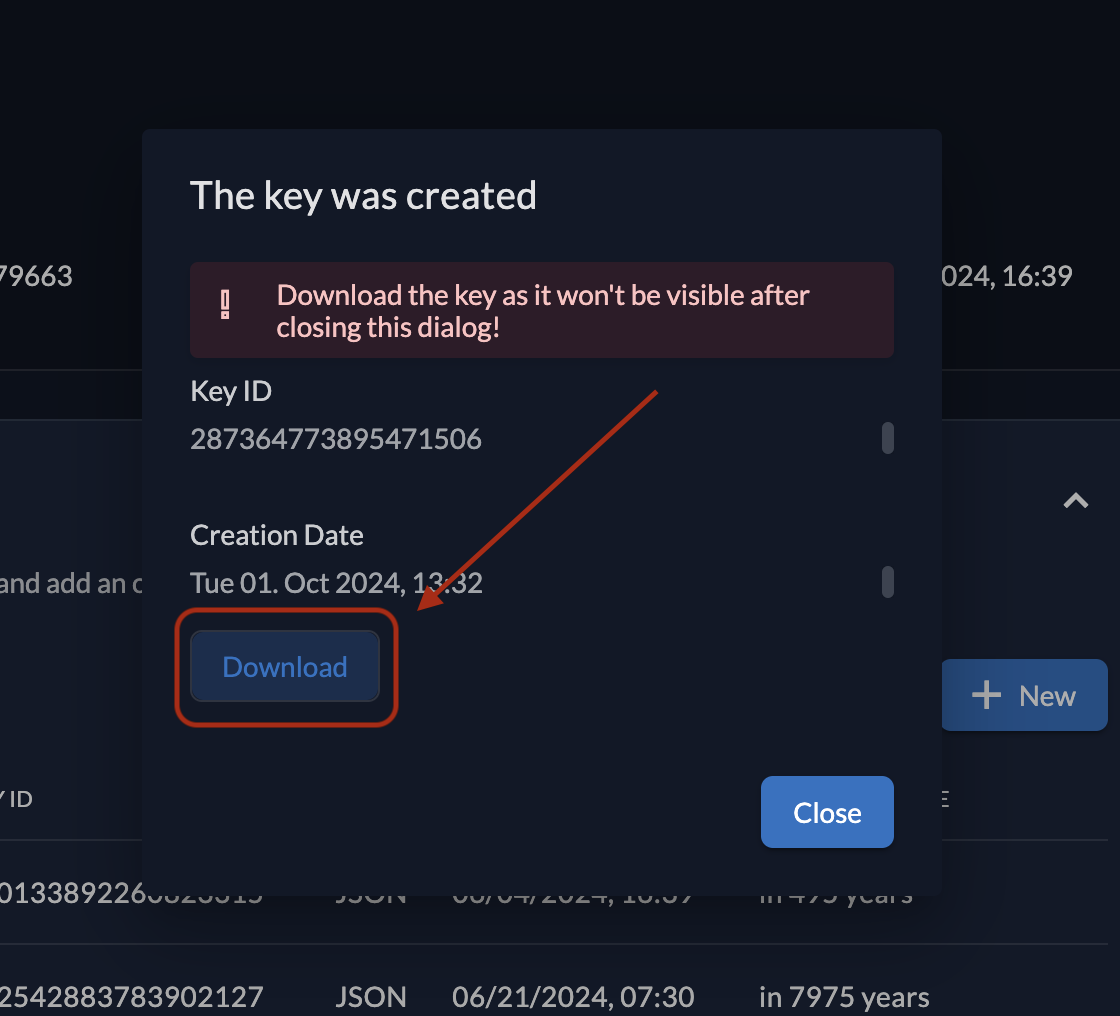
-
Encode the downloaded key in base64 to use it as the
FILE_SERVICE_ZITADEL_SECRETin your application. You may do this with the form below or by using a secure base64 encode/decode tool. Note that the entire downloaded JSON file must be encoded.Base64 Encoder
Encoded String: -
Finally, set the
FILE_SERVICE_ZITADEL_SECRETenvironment variable with the encoded secret key.
For more details, you can check out the JSON Web Token Profile in ZITADEL.
Generate FILE_SERVICE_ZITADEL_USER_MANAGER_SECRET
For this you will need to Authenticate a Service User with Private Key JWT and then generate FILE_SERVICE_ZITADEL_USER_MANAGER_SECRET
1. Create a Service User
-
Navigate to the Service Users section in the ZITADEL console.
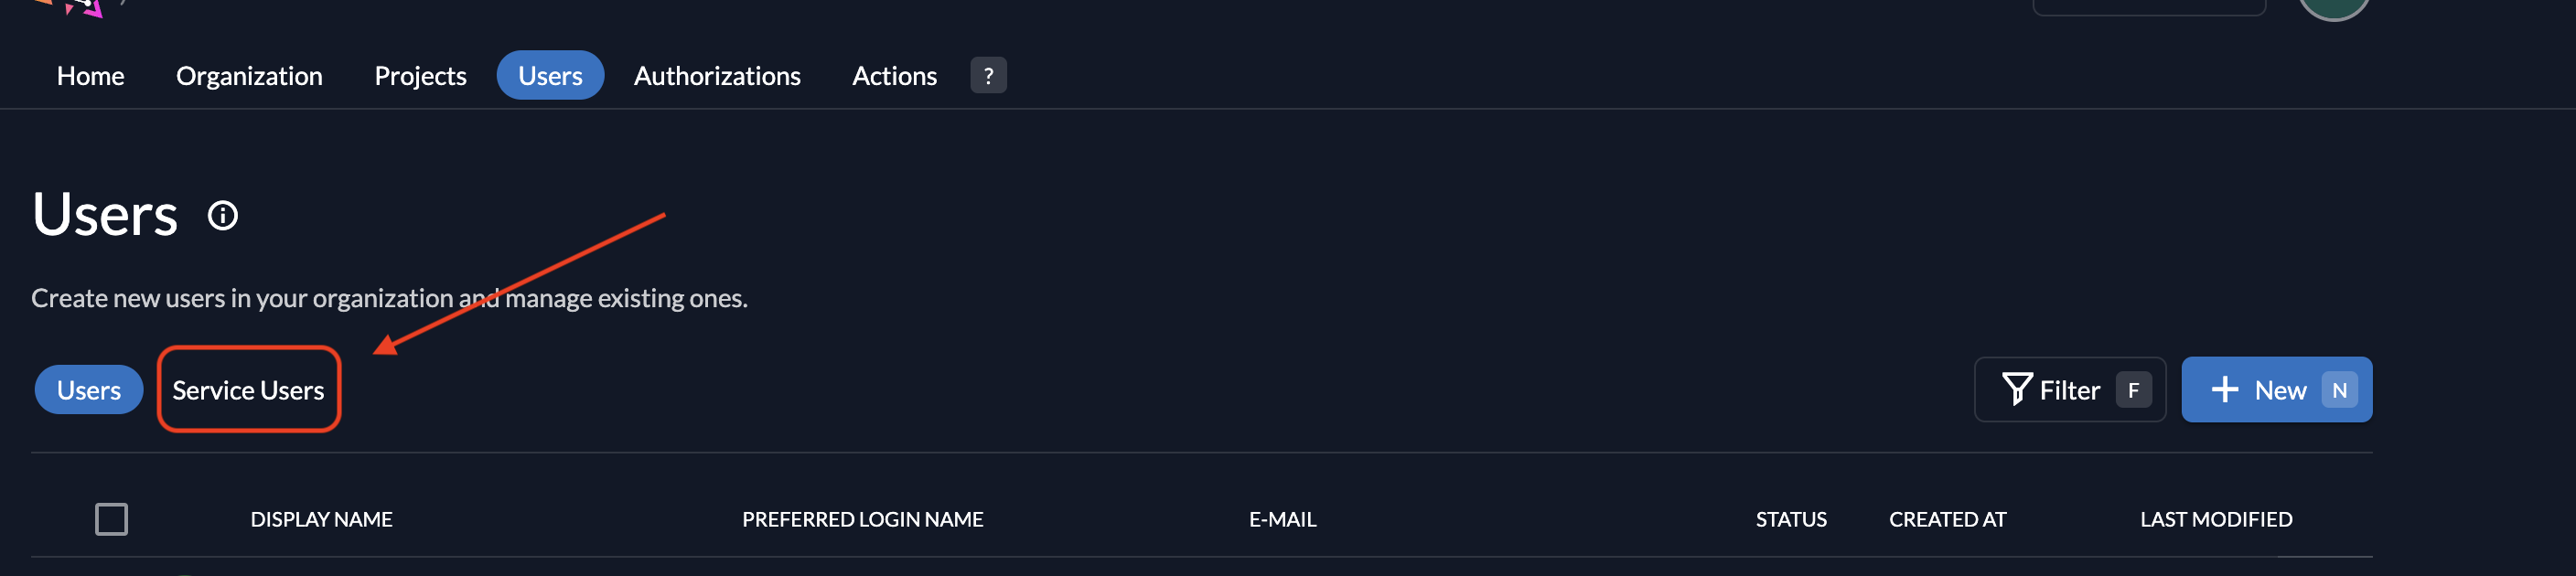
-
Click on New to create a service user.
-
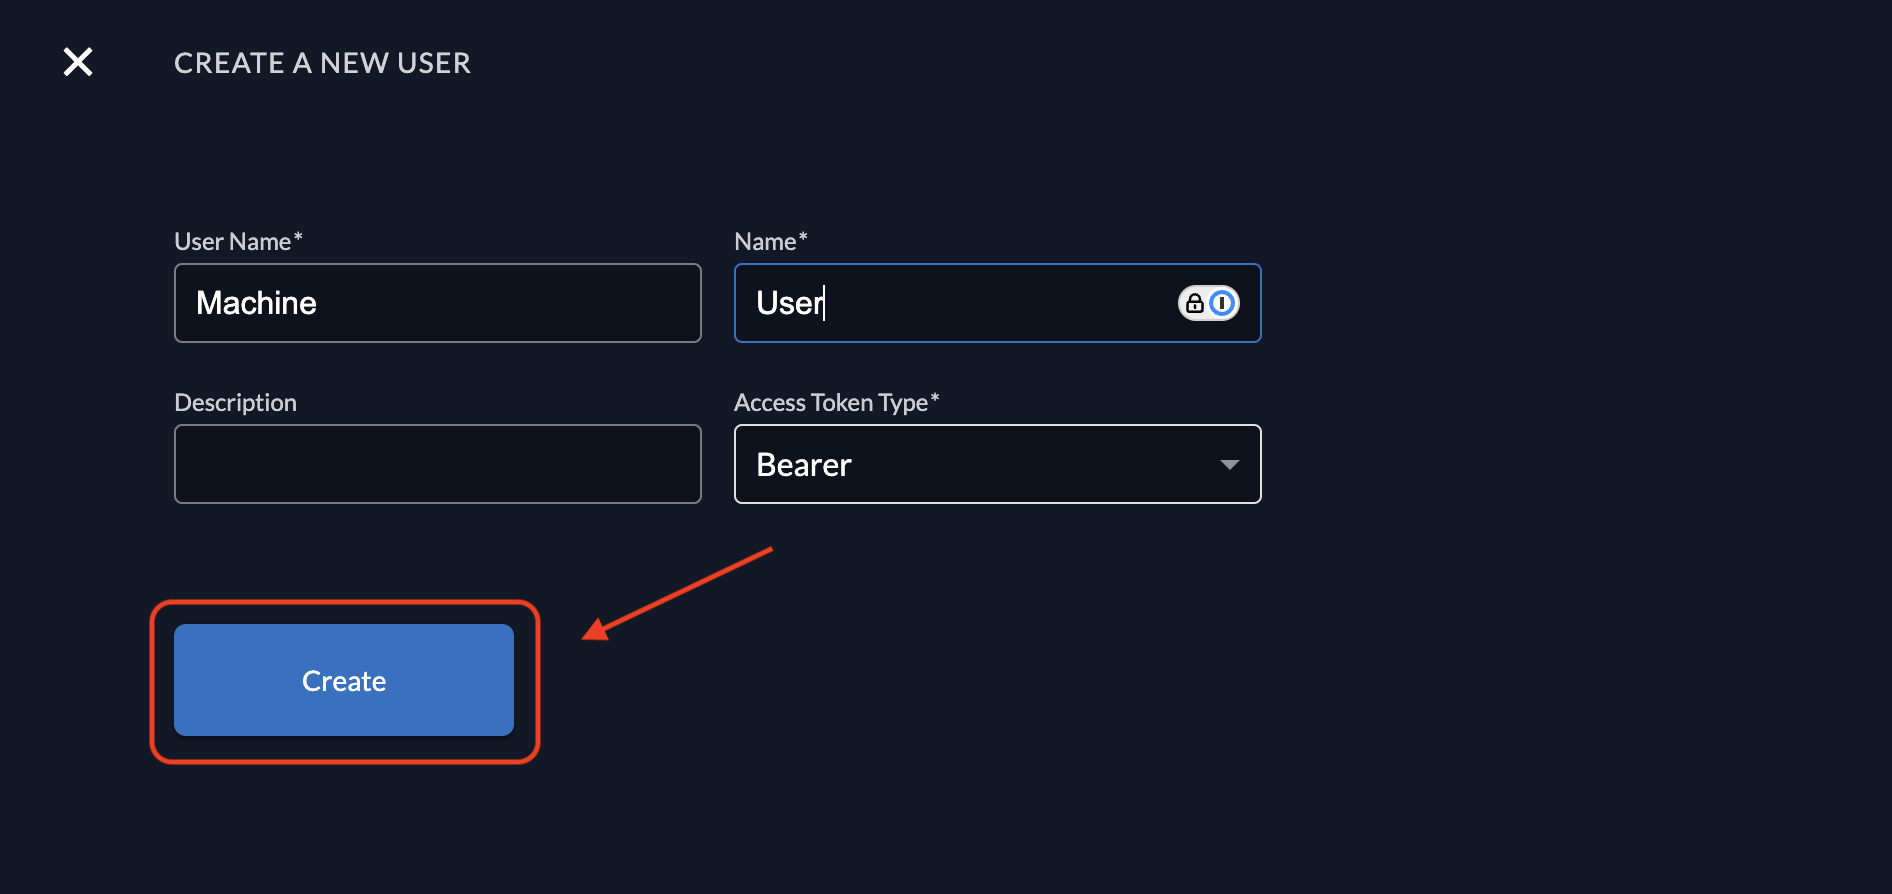
Enter a username and a display name.
-
Select Access Token Type as Bearer.
-
Click Create to finalize the service user.
2. Generate a Private Key File
-
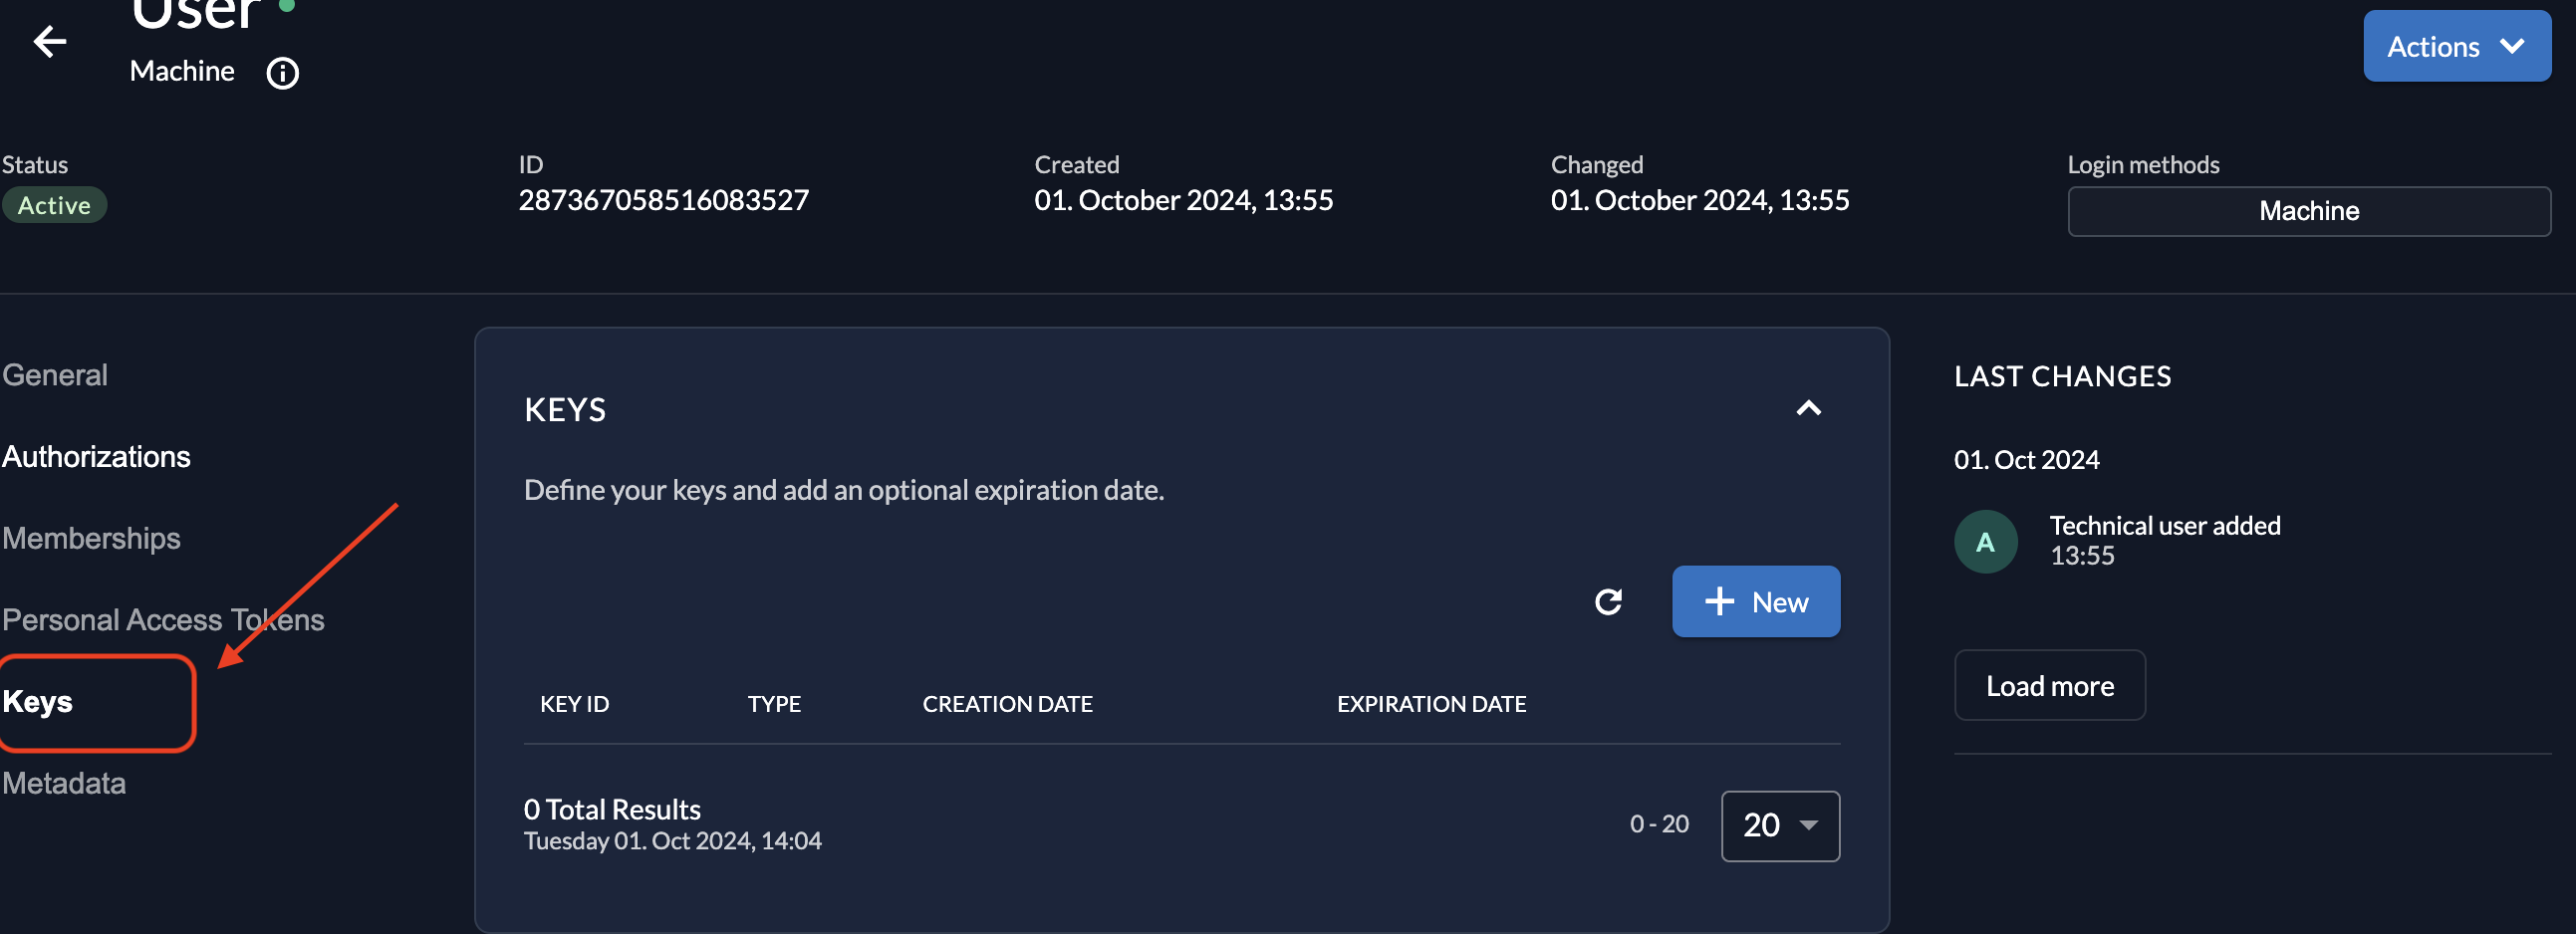
In the ZITADEL console, navigate to the details of the newly created service user.
-
Go to the Keys section under the service user's details.
-
Click on + New to generate a new private key.
-
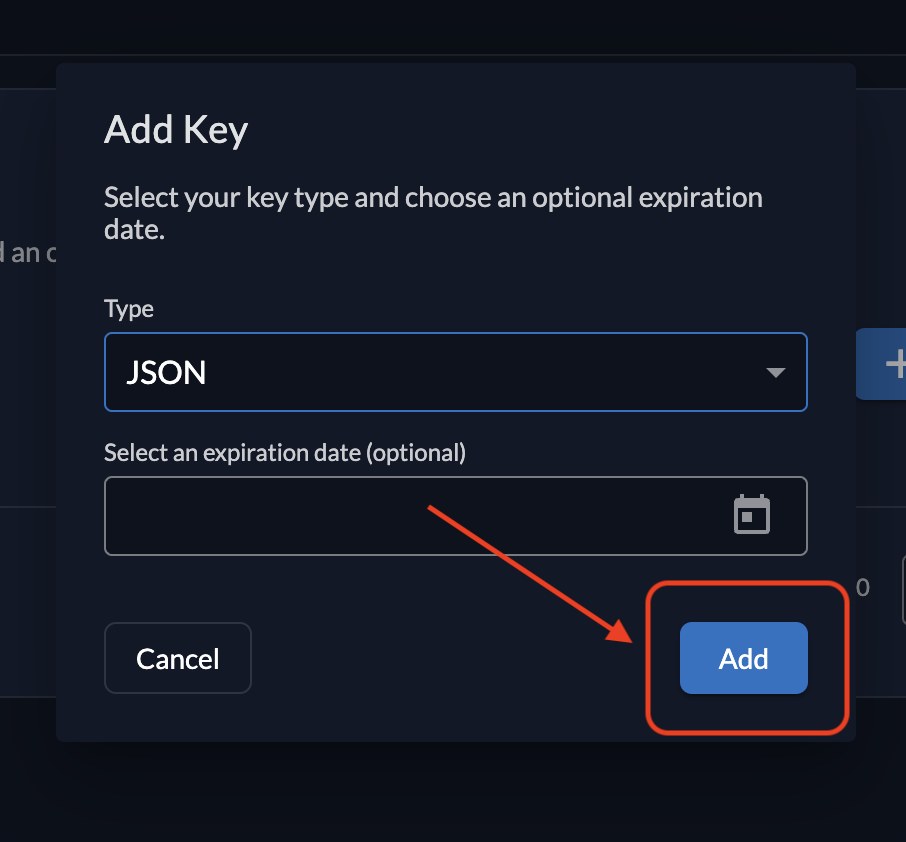
Optionally, set an expiration date for the key. If left empty, the key will not expire.
-
press Add
-
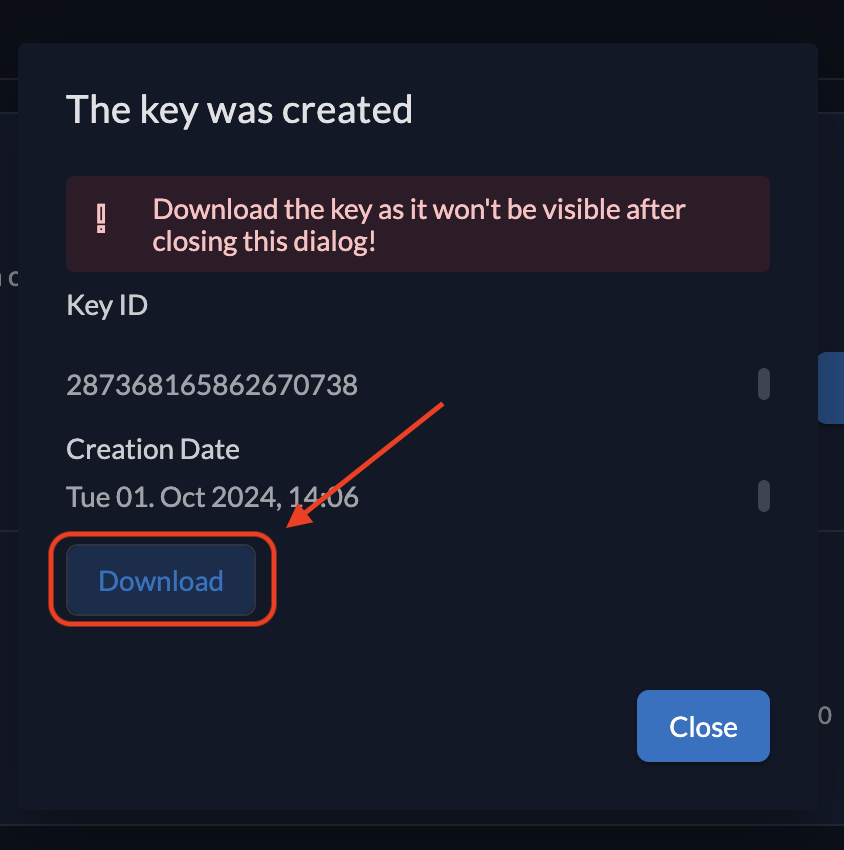
Click Download to download and save the private key file securely.
3. Encode the Downloaded Key
Encode the downloaded key in base64 to use it as the FILE_SERVICE_ZITADEL_USER_MANAGER_SECRET in your application.
You may do this with the form below or by using a secure base64 encode/decode tool.
Note that the entire downloaded JSON file must be encoded.
This secret will be used to authenticate API requests with ZITADEL using private-key JWT.
Base64 Encoder
Encoded String:for more details you can check out the Configure private key JWT authentication for service users.
4. Add Memberships for the Service User
- Go to the Organization tab in ZITADEL.
- Click the + button to add a new membership.
- Select Manager as the membership type and choose the service user's username.
- Set the role as Org Owner, then click Add to assign the service user as an organization owner.
If you want to allow users in other organizations to use Istari — e.g. the Zitadel admin in the zitadel system org — then you will need to assign this same organization owner role for those organizations to the service user.
To achieve this, follow these steps:
- From the Organizations drop down on the top left side of the portal, choose the organization you need to add the user to
- Click on the Organization tab
- Click on the plus button at the right
- When the popup appears, click on
click herelink under theLoginnamethat says:If you want to grant a user of an other organization click here, this will switch the form from a local organization user search to a global search - Enter the full login name or email address of the service account user in the other organization
- Check the
ORG_OWNERpermission - Press on
Add
For more information, consult the ZITADEL Managers documentation.

Get FILE_SERVICE_ZITADEL_CLIENT_ID
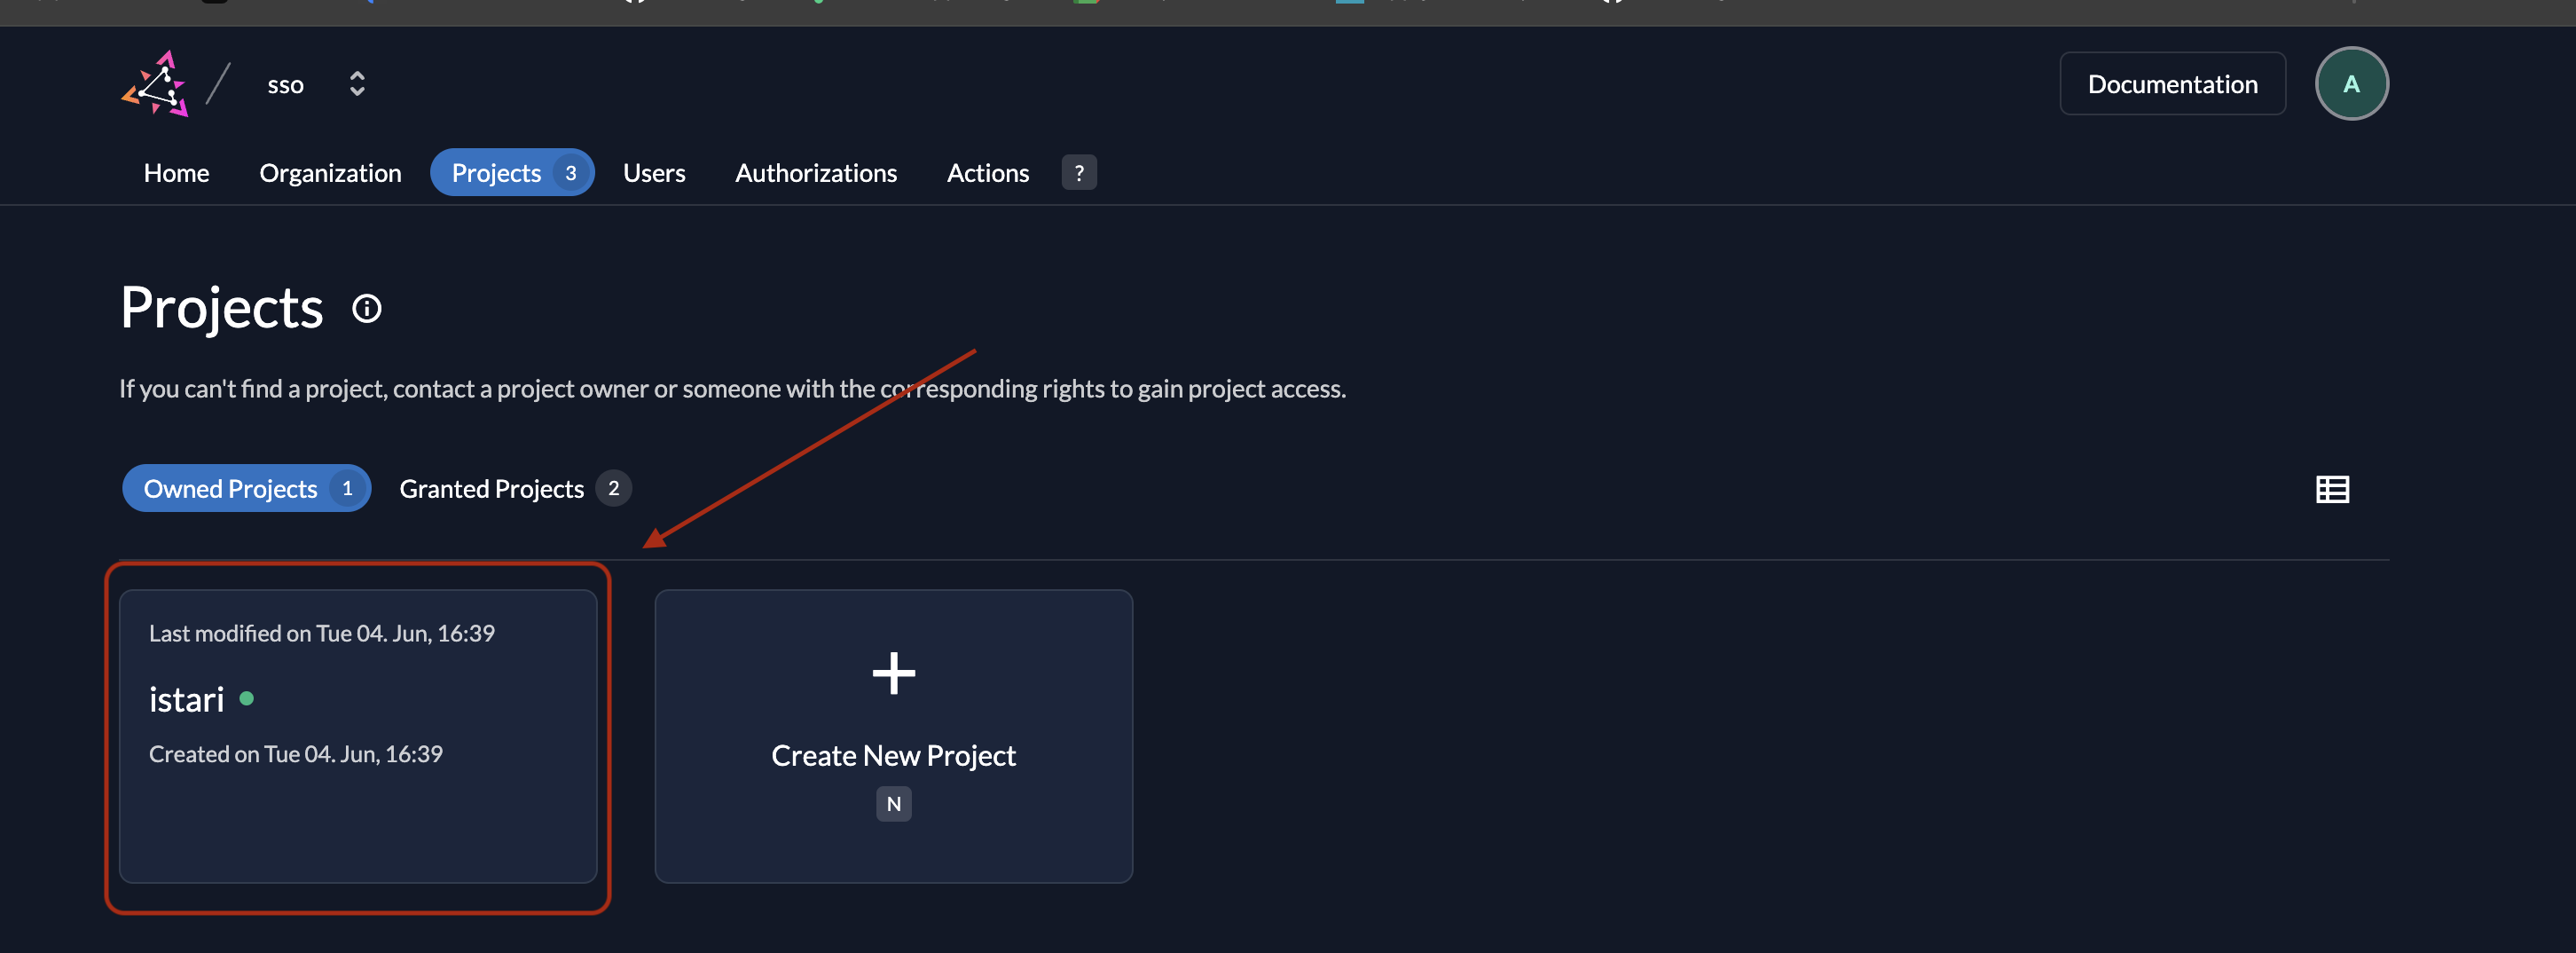
- Go to the Projects tab.
- Select Owned Project
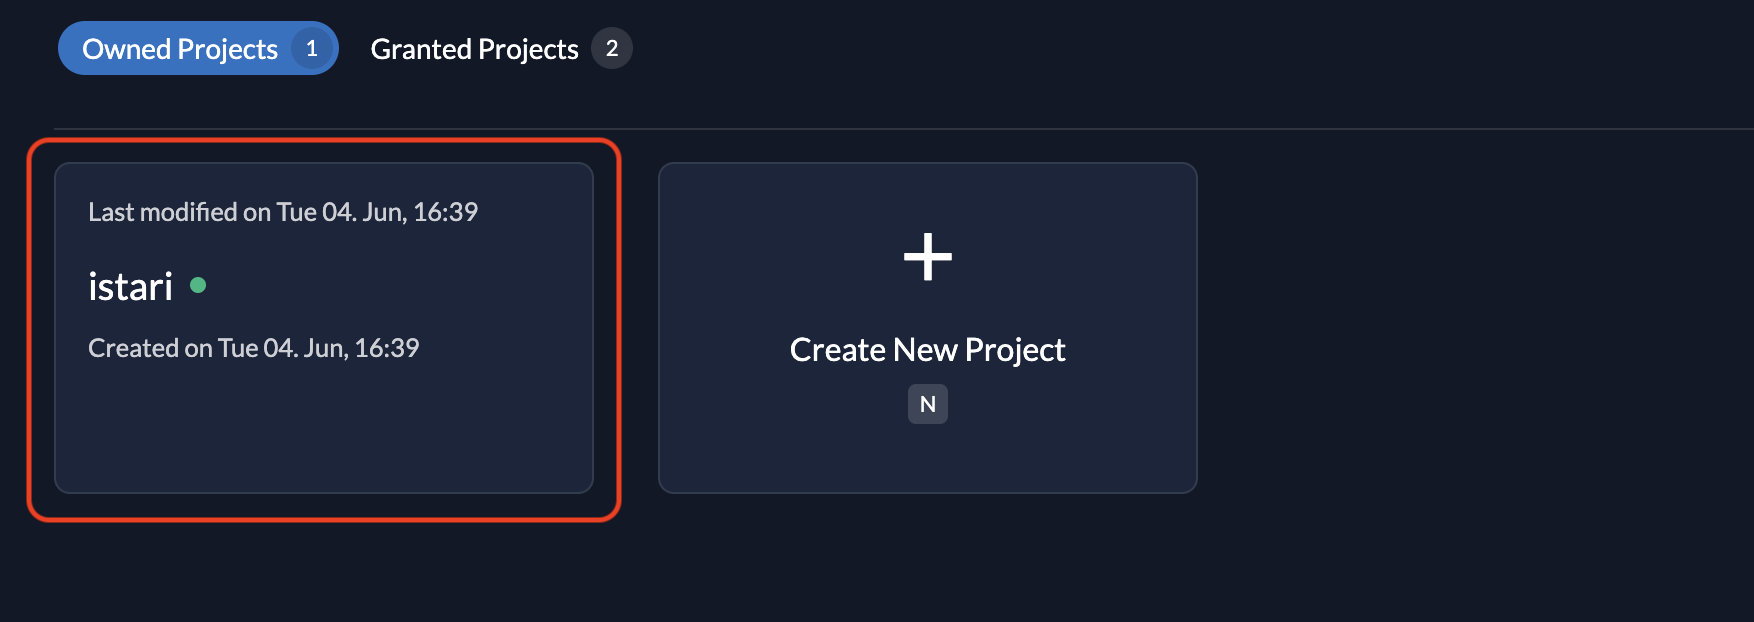
- Select the Application

You can get FILE_SERVICE_ZITADEL_CLIENT_ID from here

Get FILE_SERVICE_ZITADEL_PROJECT_ID and FILE_SERVICE_ZITADEL_PROJECT_GRANT_ID
- Go to the Projects tab.
- Select Granted Project
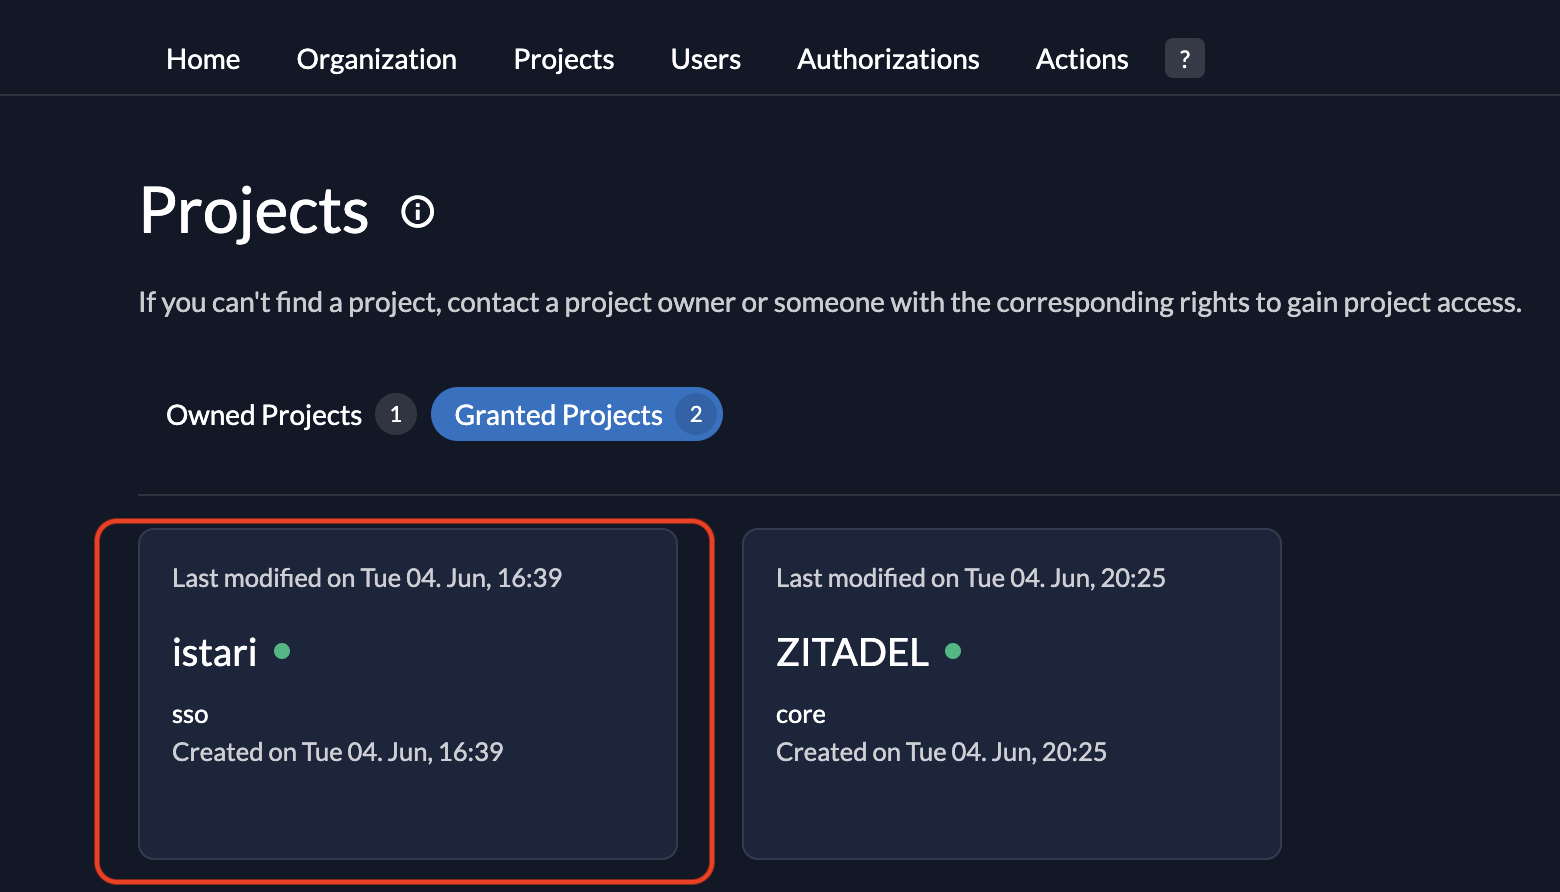
You can get FILE_SERVICE_ZITADEL_PROJECT_ID as Resource Id and FILE_SERVICE_ZITADEL_PROJECT_GRANT_ID as Grant Id

Get FILE_SERVICE_ZITADEL_JWKS_URL
This is only required on releases prior to 2025.07.1 and is now deprecated.
ZITADEL_DOMAIN+/oauth/v2/keys
Zitadel Audit Log History Configuration and Considerations
Zitadel maintains audit history of all authentication events in an event store, within the database instance discussed in the Zitadel Installation section.
These events can be viewed from the Zitadel console, as described here.
Over time, this event store can grow to be quite large. Zitadel recommends integrating these events with external systems (such as a SIEM/SOC), as described here.
In addition, Zitadel provides settings that can restrict the maximum age of events that can be returned by Zitadel APIs (therefore, to the console), as shown here. These settings do not delete history from the event store, however, they may avoid API requests that could impact system performance.